

What is Service Requests?
Service Requests gives your building team one place to receive, track, and resolve issues reported by tenants. Instead of managing requests over email or phone, everything comes in through the HqO app — organized, assigned, and trackable from the moment it’s submitted.
Tenants report problems from their phone or computer in about 30 seconds. Your team handles them from the admin portal. You’ll always know what’s open, who’s working on it, and when it was resolved.
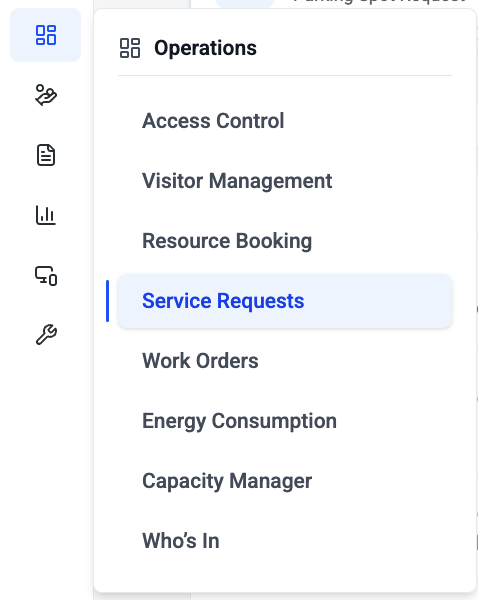
To get started, go to HqO Admin > Operations > Service Requests, or visit http://gohqo.co/admin-work-orders
Part 1: Initial Setup
Setting up for the first time
The quickest way to get your building configured is the built-in setup wizard — it walks you through every step in one place.
Go to Admin Portal > Service Requests > Configure Service Requests to open it.
|
Step |
What you’re doing |
|
1 — Select your building(s) |
Configure one building, multiple buildings, or copy settings from an existing building. |
|
2 — Choose service types |
Pick the categories of requests your building handles — Cleaning, Repairs, Temperature, Security, and more. Add your own custom categories and types too. |
|
3 — Create your teams |
Set up the groups of people who will handle requests (e.g. Engineering Team, Property Team). |
|
4 — Set up routing |
Assign each team to the categories they handle so requests go to the right people automatically — no manual sorting needed. |
|
5 — Configure statuses |
Choose which status labels to use. New, Completed, and Cancelled are required — everything else is optional, and you can create your own custom statuses. |
|
6 — Set approval rules |
Decide if any request types need sign-off before work begins. Configurable per service type. |
Tip: Once routing is set up, every new request goes directly to the right team the moment it’s submitted. No one on your team needs to triage or sort manually.
Part 2: Configuration
Service types and categories
You’re not limited to the default categories. Service types and categories can be fully tailored to match how your building operates.
The default categories include Cleaning & Waste, Temperature & Air, Repairs & Maintenance, Access & Security, Hospitality & Concierge, Signage & Facilities, and Other Requests — but you can add your own.
To add a custom category or request type: Go to Settings > Service types, then click + Add category or + Add service type.
For each service type, you can configure:
-
Which team handles it by default
-
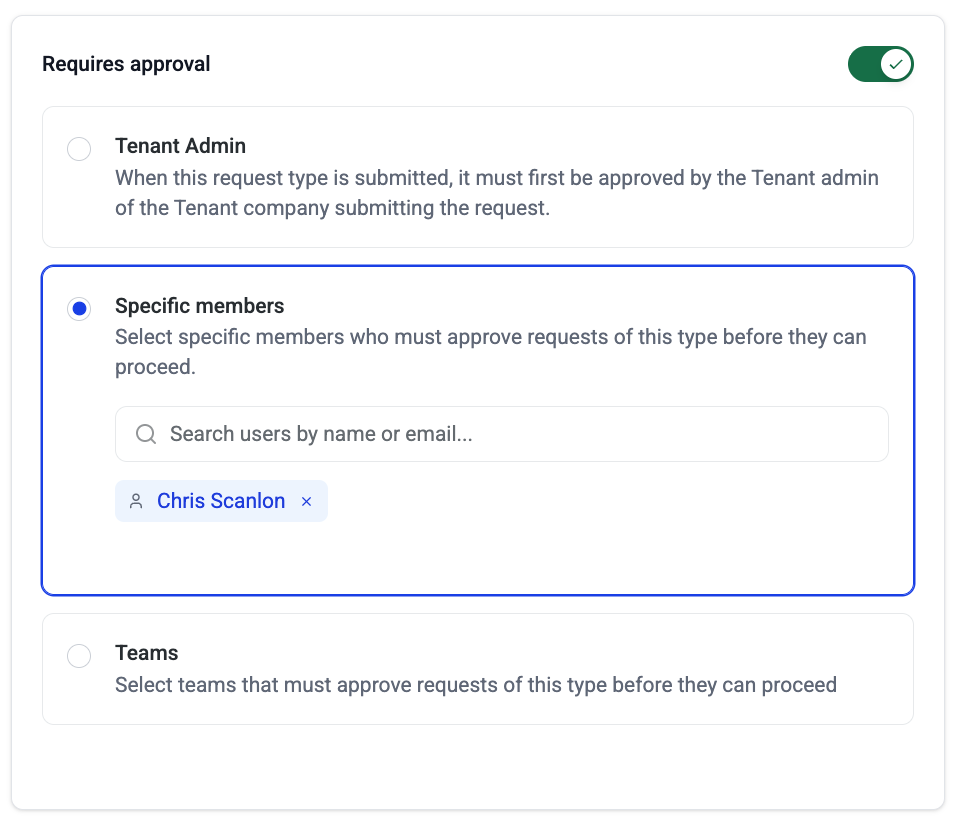
Whether approval is required before work can begin — and which role must approve
-
Custom statuses specific to that type
-
Which form tenants see when submitting that type of request
Tip: Example: Configure “Event Setup” under Hospitality & Concierge to require manager approval before work begins, and use a custom “Scheduled” status to reflect that it’s booked but not yet in progress.
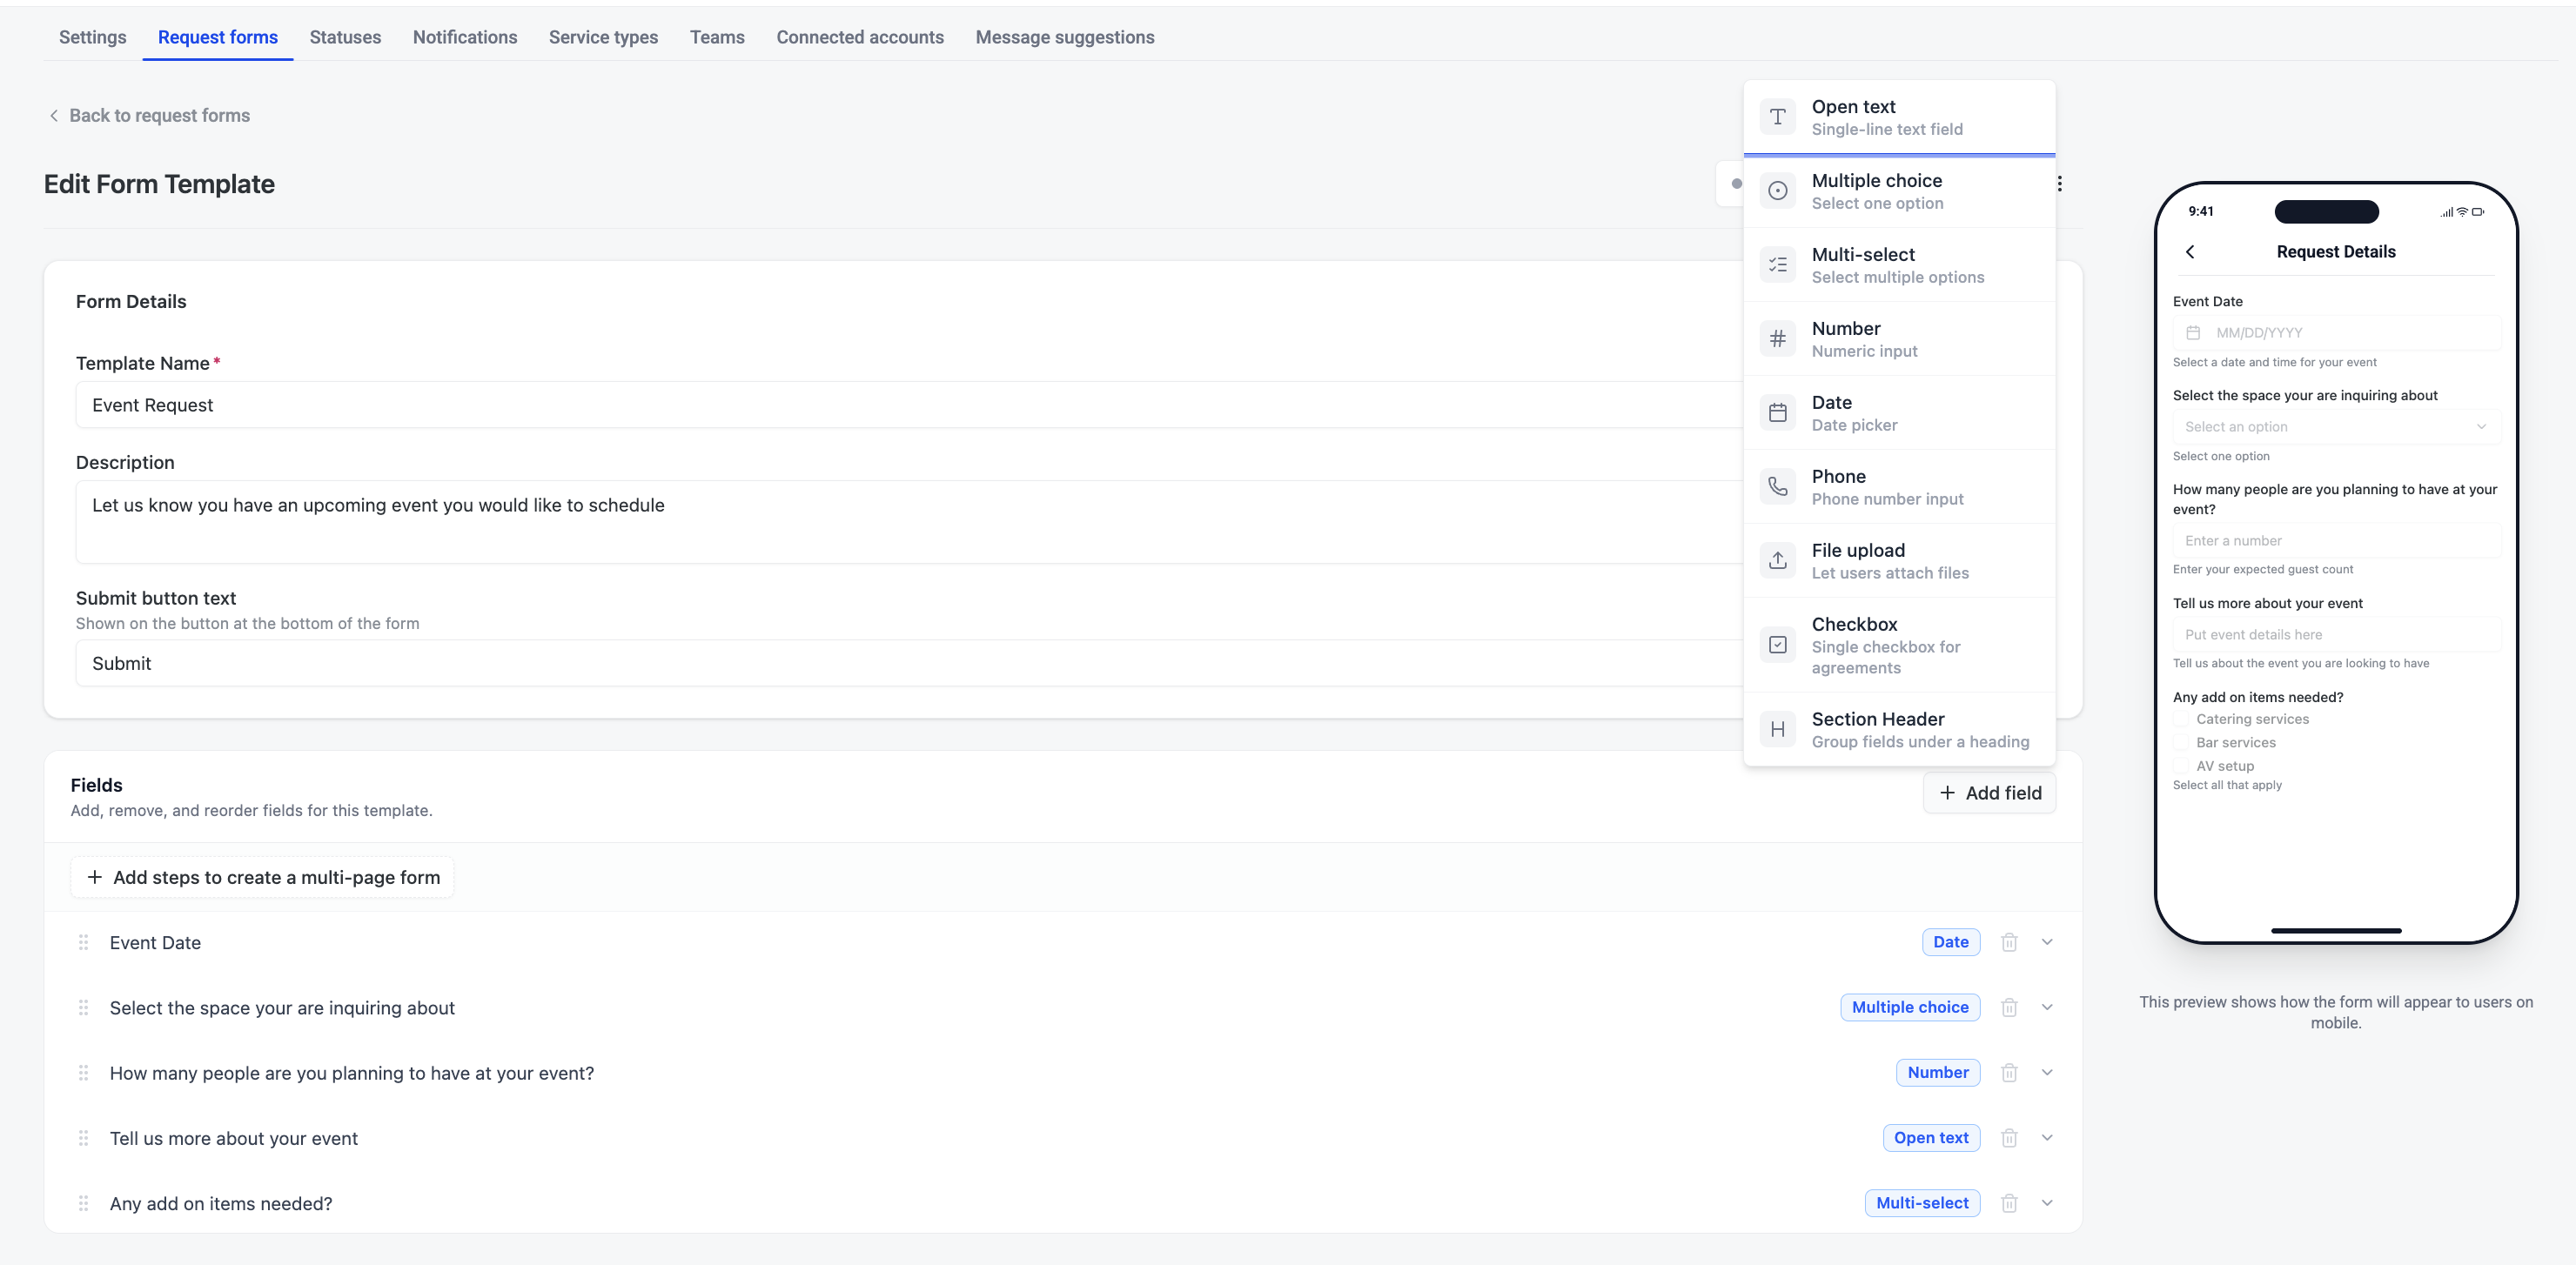
Custom request forms
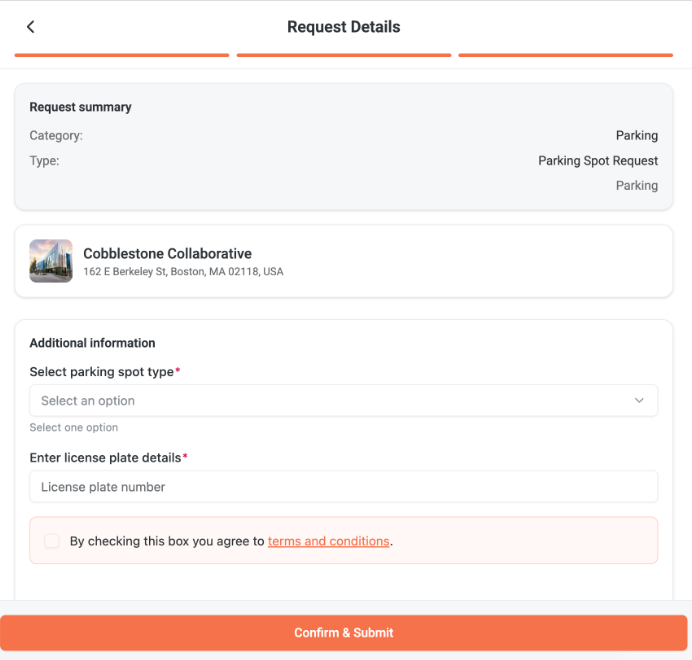
Every service type can have its own submission form. You can use the default building-level form for everything, or build custom form templates that ask tenants exactly the right questions for each type of request.
For example, a Parking Spot Request can ask for the license plate number and parking type, while an Event Setup request can ask for the date, number of attendees, and equipment needed — without cluttering simpler request types with irrelevant fields.
Available field types
|
Field type |
Description |
|
Open text |
A single-line text input — for names, IDs, short answers |
|
Multiple choice |
A dropdown where the tenant selects one option |
|
Multi-select |
A list where the tenant can select multiple options |
|
Number |
A numeric input field |
|
Date |
A date picker |
|
Phone |
A phone number input with formatting |
|
File upload |
Lets tenants attach photos or documents |
|
Checkbox |
A single checkbox — useful for terms and conditions agreements |
|
Section header |
Groups related fields under a heading within the form |
Creating a form template
-
Go to Settings > Request forms.
-
Click + Create template.
-
Give the template a name and description. Optionally customise the submit button text.
-
Click + Add field and select the field types you need.
-
Mark fields as Required if tenants must fill them in before submitting.
-
Save the template.
Once saved, assign the template to one or more service types via Settings > Service types.
Note: The default form applies to any service type that isn’t assigned a custom template. You can adjust the default form’s fields — Description, Location, Attachments, and Requested for — from the Request forms tab under Request form defaults.
Assigning a form to a service type
-
Go to Settings > Service types.
-
Open the service type you want to configure.
-
In the Request forms section, select Override building settings.
-
Choose the custom template from the Form template dropdown.
-
Save.
Tenants will now see that form whenever they submit a request of that type.
Status labels
Statuses tell everyone — your team and the tenant — exactly where a request stands.
|
Status |
What it means |
|
New |
Submitted and waiting to be picked up. |
|
In Progress |
Assigned and being actively worked on. |
|
Pending |
On hold — waiting on information, approval, or a third party. |
|
Completed |
Resolved and closed. Cannot be edited after this point. |
|
Cancelled |
Withdrawn or no longer needed. |
You can create custom statuses to match your team’s workflow — for example, “Waiting on Vendor” or “Scheduled.” Go to Settings > Statuses > + Add status.
Part 3: Day-to-Day Operations
Managing incoming requests
All requests appear in the Service Requests list as soon as tenants submit them. Each row shows the tenant’s name, what they reported, when they submitted, building and location, who it’s assigned to, and its current status.
To work a request:
-
Click it to open the detail view.
-
Assign it to a team and an individual owner (if not already auto-assigned).
-
Update the status as work progresses — you can also do this directly from the list without opening the request.
-
Use Messages to communicate with the tenant, or Internal Notes for your team only.
To create a request on behalf of a tenant: Click Add service request from the list. Select the service type, find the tenant, fill in the location and description, and click Save.
To find a specific request: Use the search bar, or filter by building, status, assignee, category, date range, or tenant company. Click Export to download the filtered list as a CSV.
Communicating with tenants
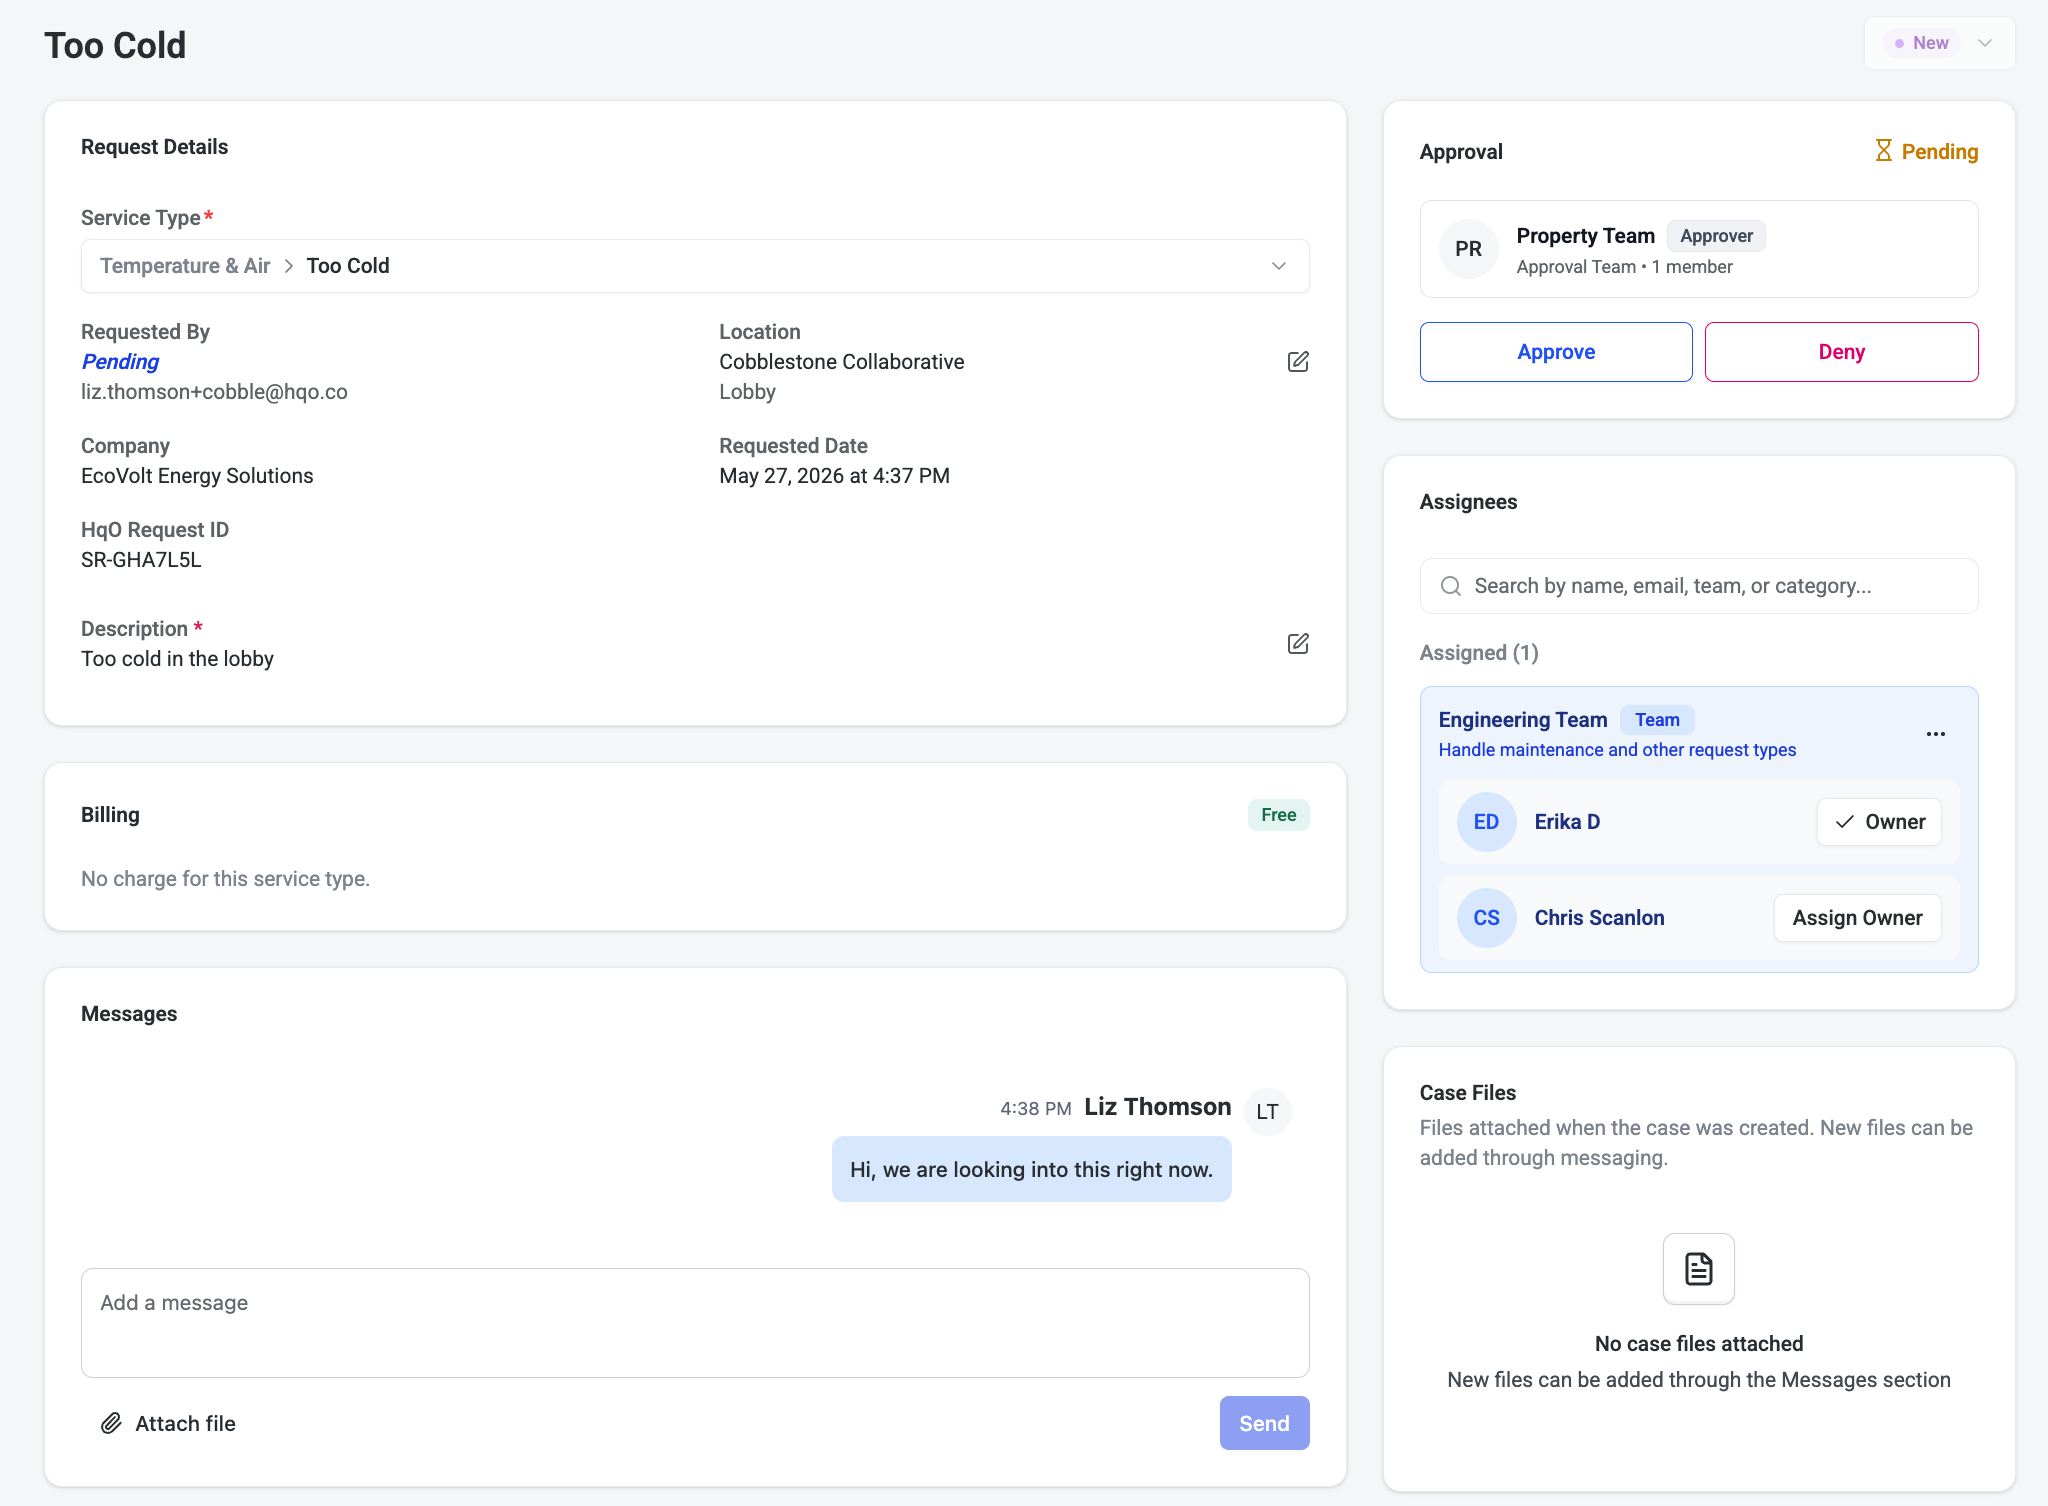
Every request has two separate communication sections:
|
Section |
Who can see it |
When to use it |
|
Messages |
Tenant and your team |
Asking questions, sharing updates, confirming completion. Tenants get notified and can reply from the HqO app. |
|
Internal Notes |
Your team only |
Coordination, context, anything the tenant doesn’t need to see. |
Both sections support file attachments.
Approvals
Approval workflows let you require sign-off before work begins on specific request types. This is useful for requests that involve cost, access, or need a second set of eyes before actioning.
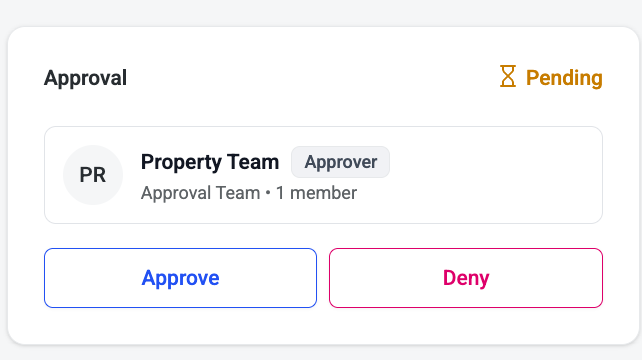
When a request requires approval:
-
The request shows a Pending approval status and the main status is locked.
-
The approver clicks Approve or Deny in the Approval panel.
-
Once approved, the assignee can update the status and proceed with the work.
-
If denied, the tenant is notified automatically.
Approval rules are set per service type — configure this in Settings > Service types.
Pre-registration requests
Property teams and tenant admins can submit service requests on behalf of people who haven’t registered on the HqO platform yet. This removes the friction of requiring someone to sign up before they can receive building services.
This is especially useful for new employees who haven’t been onboarded to HqO yet, one-off visitors or contractors who need a request created for them, and situations where the property team wants to initiate a request proactively.
How it works
-
From the Service Requests list, click Add service request.
-
Search for the person by email address.
-
If they don’t appear, click + Add new user and enter their email.
-
Fill in the service type, location, and any details you already know.
-
Save the request.
The unregistered user receives an automated email notifying them that a request has been created on their behalf. The email prompts them to sign in (or create an account) to review and complete any details only they can provide.
Once they respond, the request proceeds through the normal workflow — assigned, actioned, and resolved like any other request.
Note: Pre-registration requests work with custom forms. If the service type has a multi-step form, the admin fills in what they know and the tenant completes the rest after receiving the email invite.
Tenant admin access
When the Allow tenant admins to manage service requests setting is enabled (in Settings > Settings tab), tenant admins can also create pre-registration requests for people in their organisation — not just property team members.
After a request is resolved: feedback and sentiment
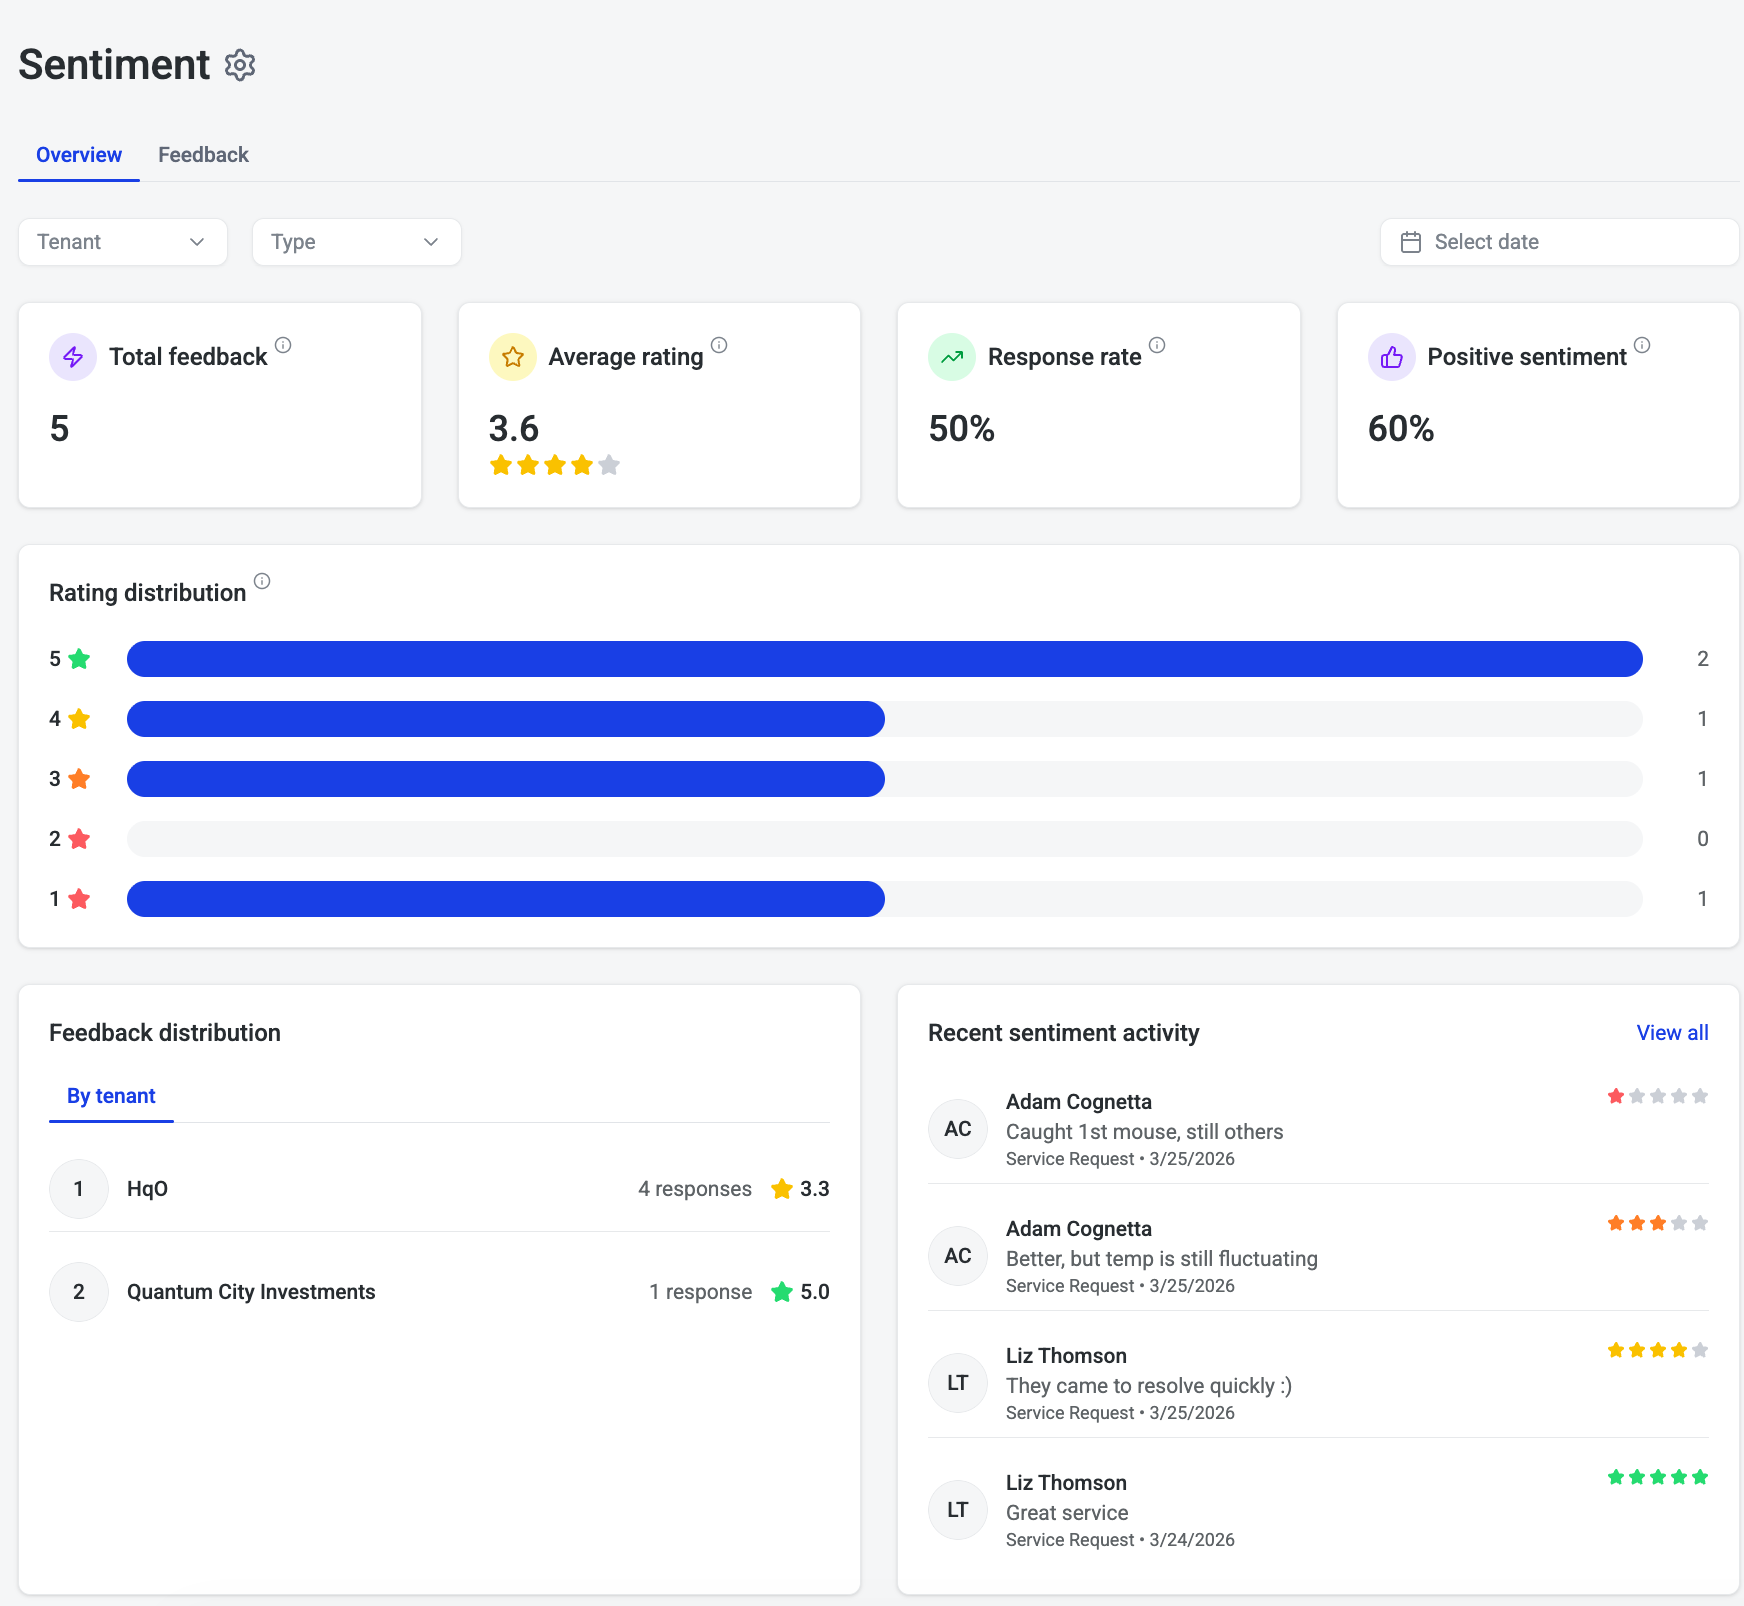
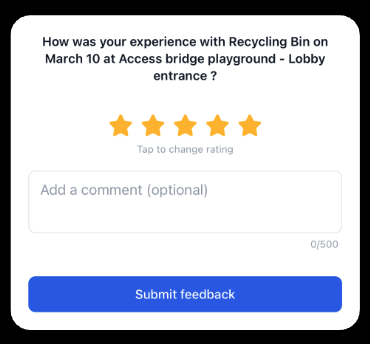
When a request is closed, tenants automatically receive a short feedback survey. Responses feed into your Sentiment dashboard, giving you a running view of how tenants feel about your building’s service.
Go to Admin Portal > Intelligence > Sentiment to see average ratings, response rates, and positive sentiment scores across your portfolio — and spot any service issues early.
Reference
Settings overview
Access all settings via the gear icon on the Service Requests page.
|
Tab |
What you can configure |
|
Settings |
Form fields (location, description, attachments), notification preferences, request ID prefix, admin alerts. |
|
Request forms |
Custom form templates that control what tenants see when submitting — assign different forms to different service types. |
|
Statuses |
Add, edit, or disable status labels. Built-in statuses can be edited; custom ones can be deleted. |
|
Service types |
Manage categories and request types, configure approval rules, assign teams, set custom statuses per type. |
|
Teams |
Create teams, add members, and assign which service categories each team handles. |
|
Connected accounts |
Link external systems (e.g. Salesforce) to sync requests automatically. |
|
Message suggestions |
Save preset reply templates so your team can respond to tenants quickly with consistent messaging. |
Common questions
How do I give a team member access to manage requests in the admin portal?
Assign the person to a user profile or to a team in Service Requests. HqO will automatically grant them the operator role in the background — you don’t need to configure permissions separately.
Can tenant admins manage requests, or only property team members?
Both. When the Allow tenant admins to manage service requests setting is enabled (Settings > Settings tab), tenant admins can view, create, and manage requests for people in their organisation.
How does my team get notified about new or updated requests?
Email notifications are sent for new assignments and status changes. Each team member can configure their notification preferences in Settings.
Can I require tenants to attach a photo or file when submitting a request?
Yes. The Attachments field is available on the default form and can be enabled or disabled per building. If you use a custom form, you can also add additional file upload fields and mark them as required.
Why can’t I change the status on a request?
Two reasons: either the request is pending approval (approve or deny it first), or it’s been marked Completed — Completed is a terminal state and cannot be modified.
Can a completed request be reopened?
No. Once a request is marked Completed it is permanently closed and cannot be edited or reopened. If work needs to resume, create a new request.
Can I delete a request?
No. Requests cannot be deleted — they remain in the system permanently. If a request is no longer needed, mark it as Cancelled instead.
If I update a routing rule, will open requests be reassigned automatically?
No. Routing changes only apply to new requests submitted after the change. Requests that are already open keep their current assignment.
Is there a way to get alerts if a request hasn’t been picked up within a certain time?
Not currently. There are no built-in SLA timers or escalation alerts. Monitor the request list regularly and filter by New status to catch anything that hasn’t been assigned.
Can I manage requests from multiple buildings in one view?
Yes. The request list shows all buildings by default. Use the building filter to narrow to a specific property, or the Company filter to see all open requests from a specific tenant organization.