Leases
Centralize every tenant lease in one place — financials, key dates, and occupied spaces — so your team always has an up-to-date picture of your portfolio.
Leases Portfolio View
The Leases list is your portfolio-wide view of every active and upcoming lease. At the top, three summary cards give you an at-a-glance snapshot:
-
Total active leases — the number of leases currently in active status across your portfolio.
-
Total annual rent — the combined annual rent value of all active leases.
-
Upcoming expirations — leases expiring soon that may need renewal attention.
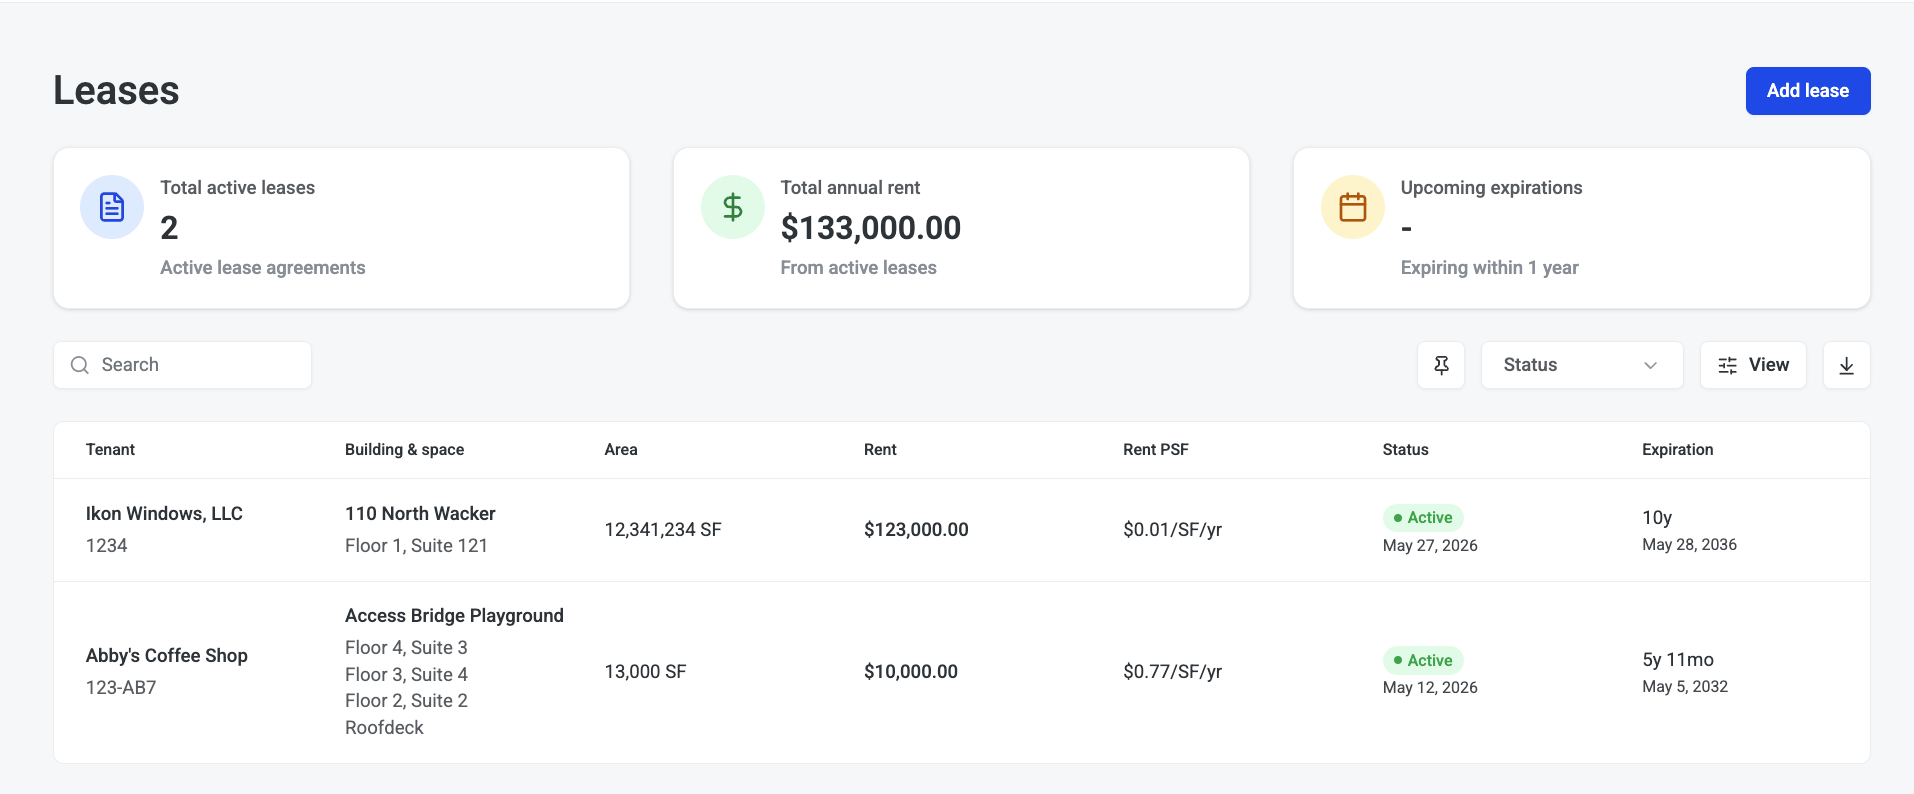
Below the cards, each row in the table shows:
|
Column |
What it shows |
|
Tenant |
The tenant company name. |
|
Building & space |
The building name and suite(s) covered by the lease. |
|
Area |
Total leased square footage. |
|
Rent |
Annual rent amount. |
|
Rent PSF |
Annual rent per square foot. |
|
Status |
Current lease status (e.g. Active, Upcoming, Expired). |
|
Expiration |
The date the lease ends. |
Click any row to open the full lease record. To create a new lease, click Add lease in the top-right corner.
Adding a lease
Creating a lease takes three steps. You can move forward and back between steps before confirming.
Step 1 — Parties & spaces
Start by identifying who the lease is between and which spaces it covers.
-
Landlord — select the landlord entity from the dropdown.
-
Tenant — select the tenant company.
-
Lease number — enter the internal or external reference ID for this lease.
-
Building — choose the building where the leased spaces are located. Click + Add building to include spaces across multiple buildings.
-
Floor and suite — specify the floor, suite name or number, and space type. Click + Add space to add more suites within the same building.
Step 2 — Lease terms
Enter the financial and temporal details of the lease.
-
Commencement date — the date the lease starts.
-
Expiration date — the date the lease ends.
-
Area (SF) — the total leased square footage.
-
Annual rent ($) — the base annual rent amount.
-
Lease structure — select the rent structure type (e.g. gross, net, modified gross).
Step 3 — Review & confirm
A summary of everything you've entered — parties, spaces, and terms — is shown for review. Check all details before clicking Create lease to save.
Lease overview
Opening a lease takes you to its Overview tab. This is the main record, showing current status, financials, and all key lease information in one view.
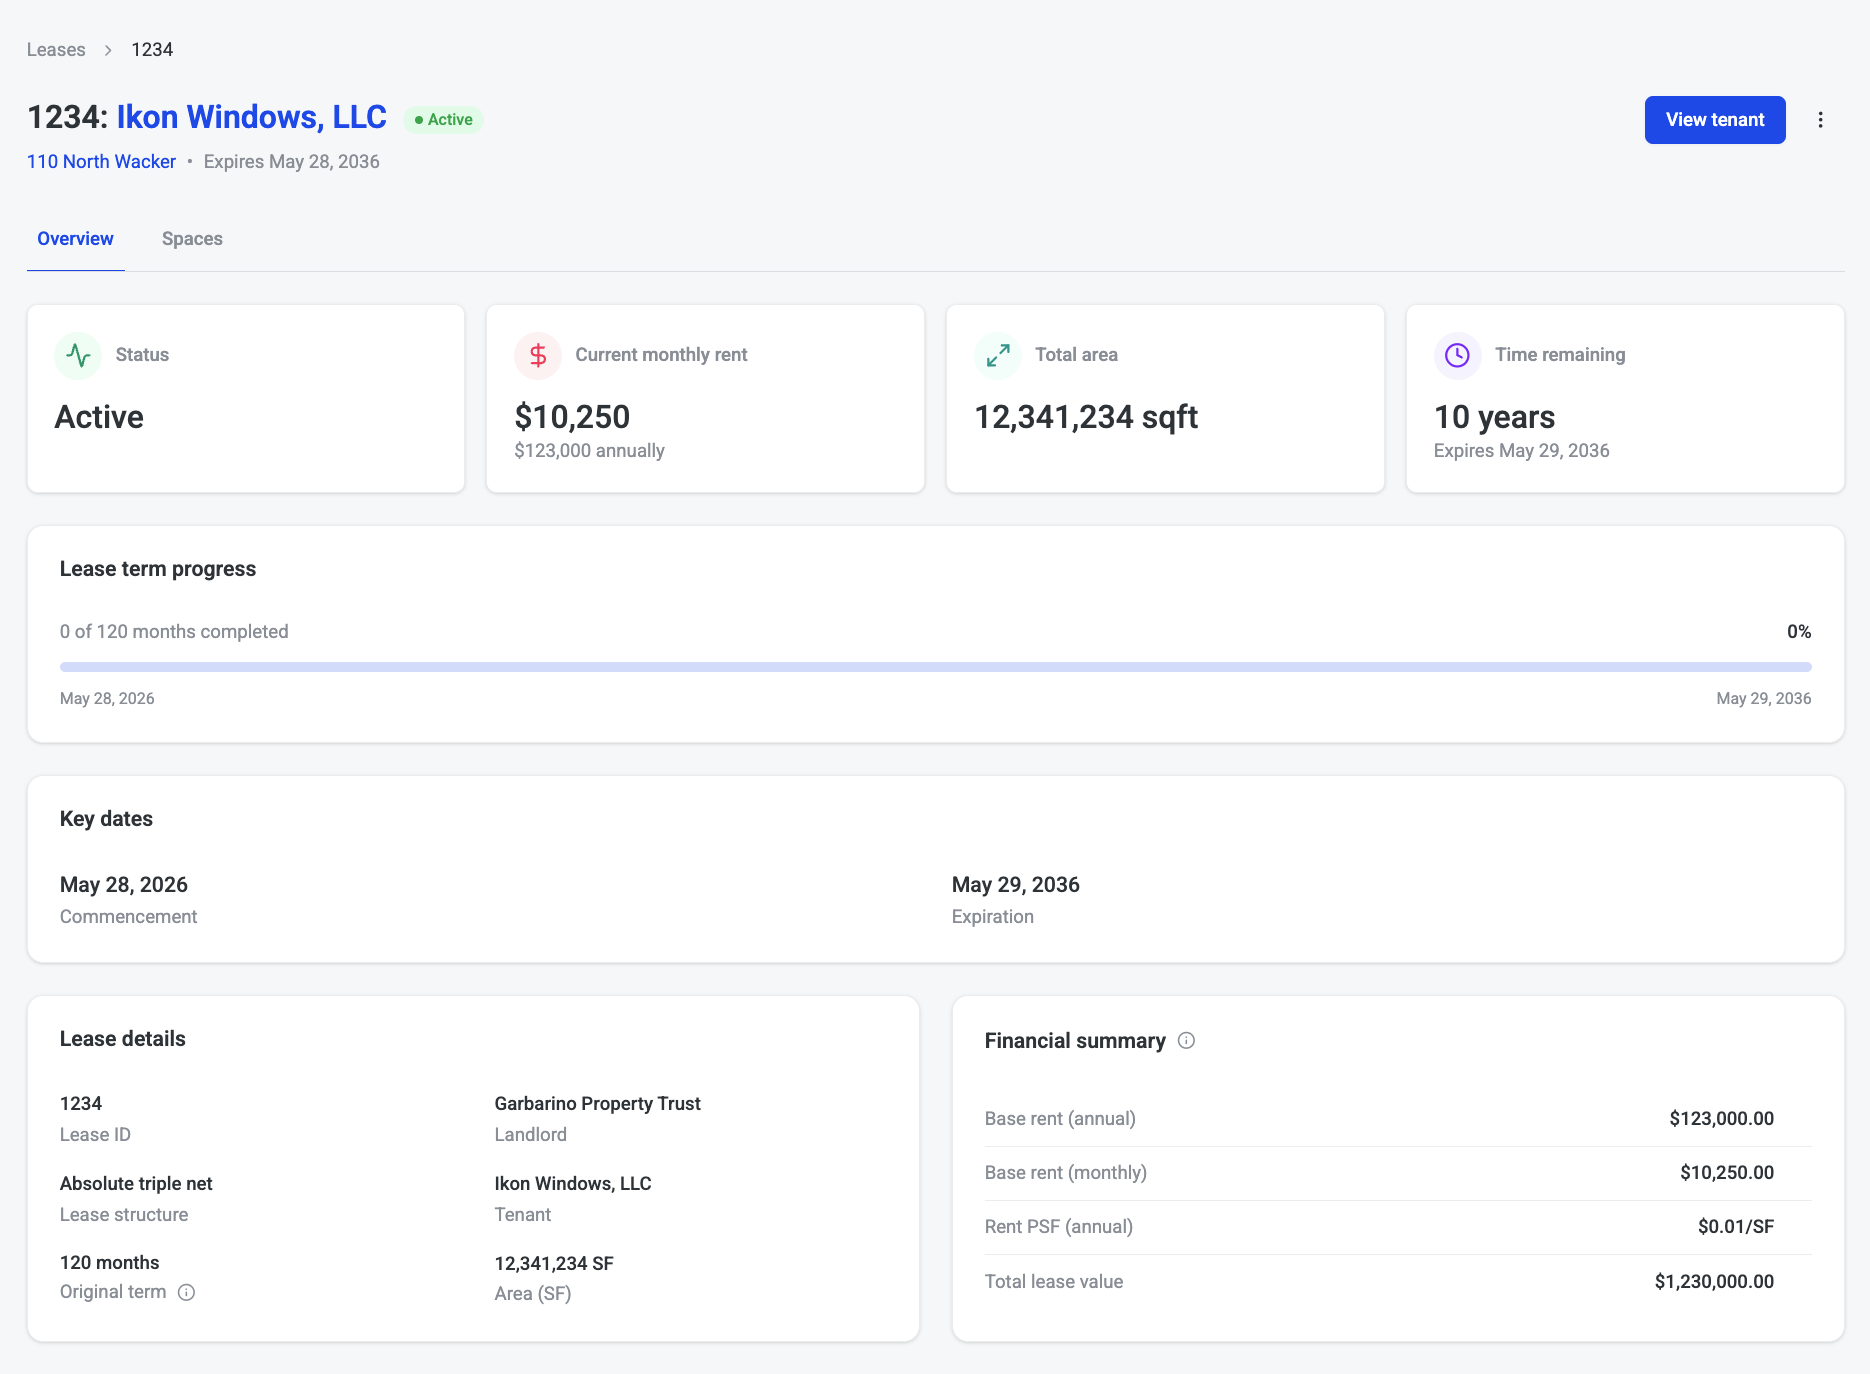
Status cards
Four cards across the top summarize the lease at a glance:
|
Card |
What it shows |
|
Status |
The current lease status (e.g. Active, Upcoming, Expired). |
|
Current monthly rent |
The monthly rent amount derived from the annual base rent. |
|
Total area |
Total square footage across all leased spaces. |
|
Time remaining |
How much of the lease term is left, shown with a progress bar spanning commencement to expiration. |
Key dates
The Key dates section lists the commencement date and expiration date. These drive the progress bar and any upcoming expiration alerts visible in the Leases list.
Lease details
The Lease details section shows the core record fields: lease ID, landlord, lease structure, tenant, and total area.
Financial summary
The Financial summary section breaks down the economics of the lease:
-
Base rent (annual and monthly)
-
Rent per square foot (PSF)
-
Total lease value over the full term
Spaces
The Spaces tab shows all the buildings and suites covered by the lease. Each building appears as a card with a photo and address, and beneath it, a table lists the floors, suite names, and space types.
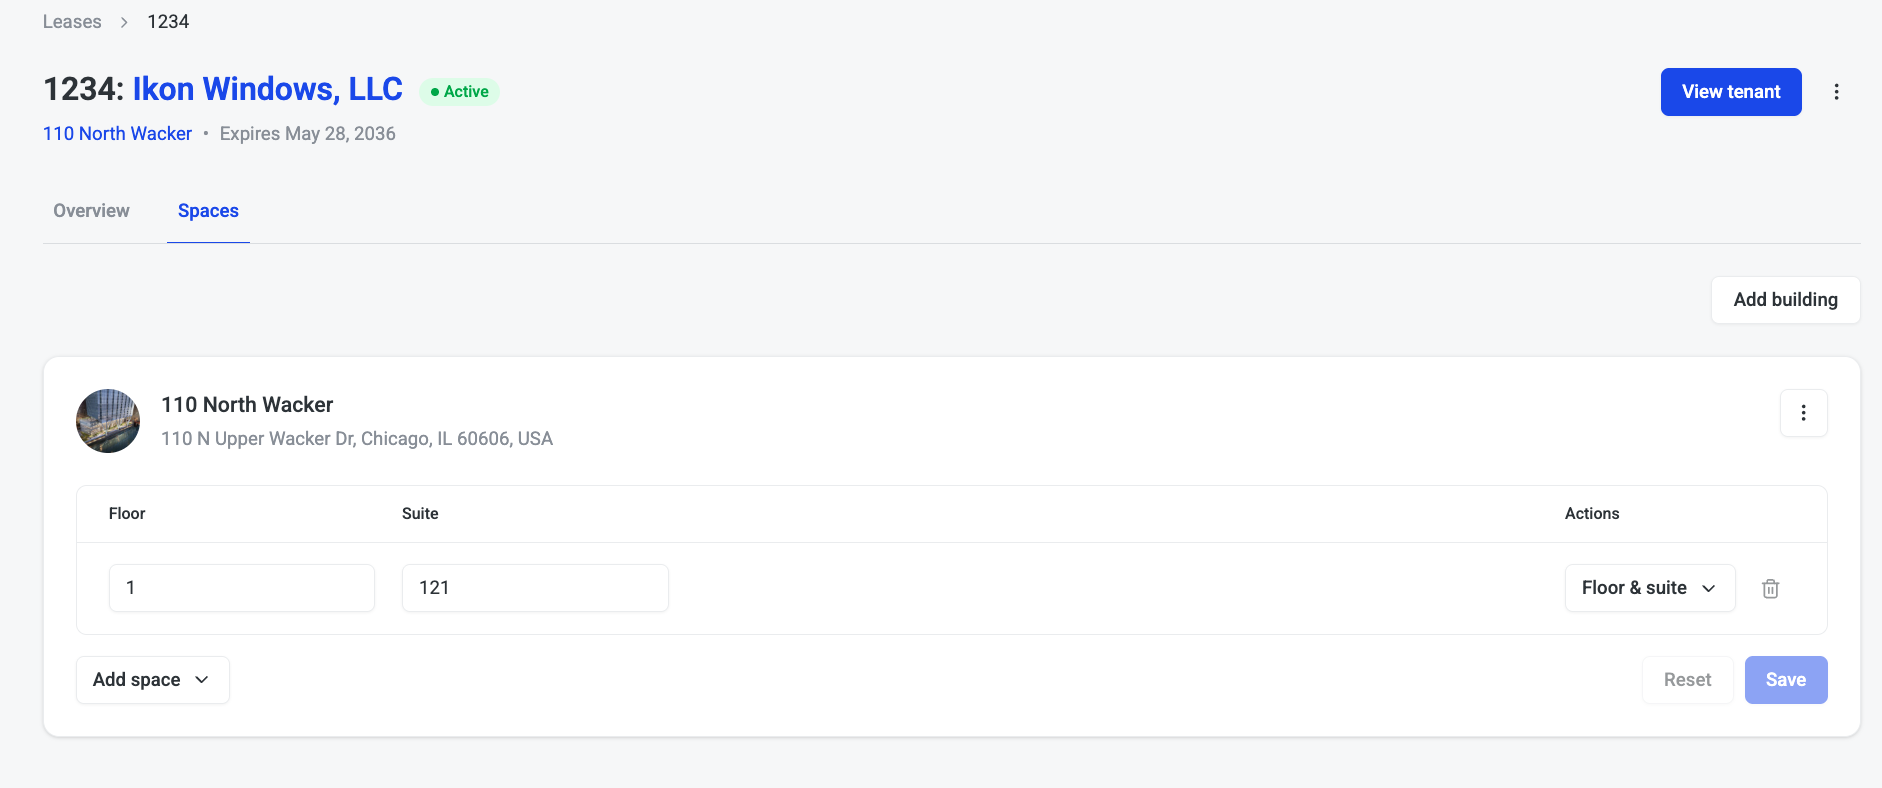
To add a space to an existing lease, click + Add space on the relevant building card, or + Add building to bring in spaces from a different property. After making changes, click Save to confirm, or Reset to discard.
Note: Changes to spaces on an active lease take effect immediately. Make sure the commencement date and area in the Overview tab are updated to reflect any additions or removals.