Overview
Contact Tagging is a powerful CRM feature that enables property teams to organize, categorize, and quickly identify key stakeholders, decision-makers, and important relationships across their tenant portfolio. By applying tags to tenant contacts, you empower your entire staff—from frontline concierge to property managers—with instant context about who matters, ensuring VIPs and critical stakeholders receive personalized, informed service.
In large buildings or campuses with hundreds or thousands of tenant employees, tagging solves a critical challenge: helping your team know who's important without requiring extensive training or institutional knowledge.
Key Benefits
-
Democratize Relationship Knowledge - Share critical information about important contacts across your entire team
-
Enable Personalized Service - Frontline staff can instantly identify VIPs, executives, and decision-makers
-
Organize at Scale - Categorize contacts across hundreds of tenants without complex manual tracking
-
Filter for Efficiency - Quickly find specific groups of contacts (all VIPs, all primary contacts, etc.)
-
Flexible Categorization - Create custom tags that match your organization's needs and workflows
-
System-Powered Features - Protected system tags drive product functionality like filtering and display logic
Understanding Tag Types
HqO supports two types of tags, each serving different purposes:
Custom Tags
User-created tags that provide flexible categorization based on your organization's needs.
Examples:
-
VIP
-
Executive
-
Decision Maker
-
Facilities Lead
-
Finance Contact
-
Safety Coordinator
Characteristics:
-
Created by your team
-
Fully customizable (name, color, description)
-
Can be edited or deleted at any time
-
Used for organizational purposes and filtering
System Tags
Protected tags maintained by HqO that power product functionality across the platform.
Examples:
-
Primary Contact
-
Show on Overview
-
Emergency Contact
-
Tenant Point of Contact
Characteristics:
-
Pre-created by HqO
-
Cannot be deleted (protected)
-
Drive filtering, sorting, and display logic throughout the application
-
Ensure uniform functionality across all customers
-
Appear with a "System Tag" indicator in the Manage Tags interface
Why System Tags Matter: Certain product features require consistent tagging to function properly. System tags ensure that critical workflows—like identifying primary contacts or displaying emergency contacts—work reliably across the entire platform.
How Tagging Works
Viewing Tags on Contacts
From the Tenant Detail Page:
-
Navigate to a tenant's Detail Page
-
Click the Contacts tab in the secondary navigation
-
Tags appear as colored badges next to each contact's name
-
Multiple tags can be applied to a single contact
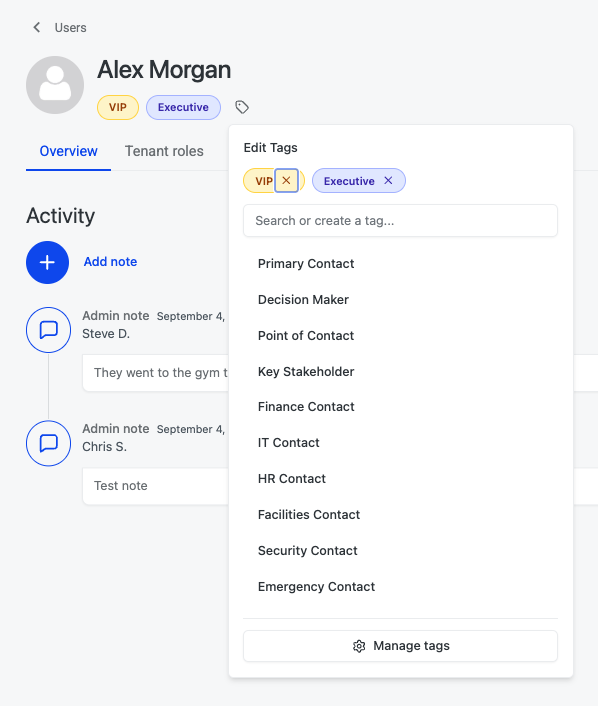
Example: Alex Morgan might display tags for "VIP" and "Executive" next to their name.
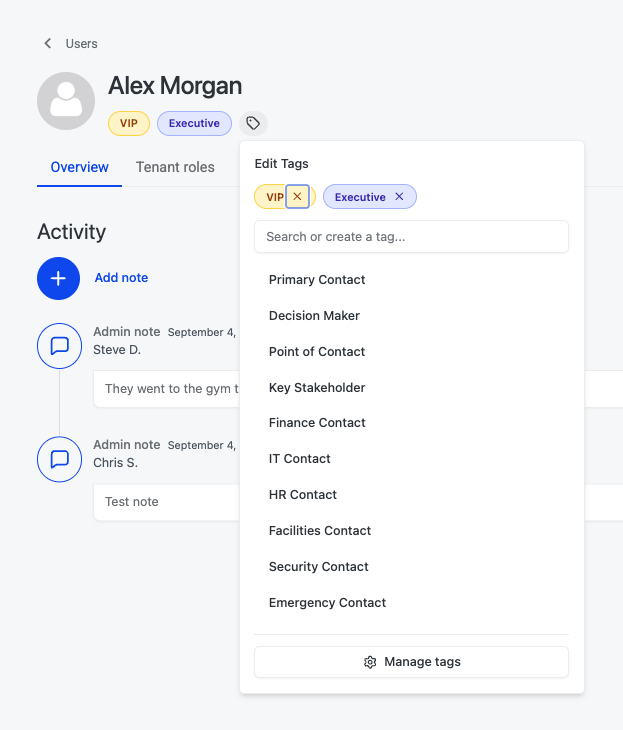
Applying Tags to Contacts
From a Contact's Detail Page:
-
Click on any contact name to open their detail page
-
Locate the tags section (displays any existing tags)
-
Click the tag icon next to existing tags
-
A dropdown appears with two options:
-
Select tags - Choose from your existing tag library
-
Manage tags - Access the tag management interface (see below)
-
-
Check the tags you want to apply to this contact
-
Tags appear immediately as colored badges
Applying Multiple Tags:
-
You can apply as many tags as needed to a single contact
-
Tags appear in the order they were created
-
Each tag displays in its designated color for visual distinction
Filtering Contacts by Tags
Once tags are applied, you can filter to find specific groups of contacts:
From the Contacts Tab:
-
Navigate to the tenant's Contacts tab
-
Click the Tags filter dropdown
-
Select one or more tags (e.g., "VIP")
-
Click Apply
-
The contact list updates to show only people with the selected tag(s)
-
Use the Pin icon to save your filter for future visits
Removing Filters:
-
Click the Tags filter dropdown
-
Click Clear or deselect specific tags
-
The full contact list returns
Common Filter Use Cases:
-
Find all VIPs across a tenant to plan white-glove service
-
Identify all Primary Contacts for communication campaigns
-
Locate all Emergency Contacts for safety protocols
-
Filter to Decision Makers when planning lease renewals
Managing Your Tag Library
Accessing Manage Tags
Current Access Point:
-
Navigate to any contact's detail page
-
Click the tag icon next to their tags
-
Select Manage tags from the dropdown
Future Access: The Manage Tags interface will be available directly from Settings (coming soon).
The Manage Tags Interface
The Manage Tags page provides centralized control over your entire tag library:
Key Features:
-
Search tags - Find specific tags by name
-
View usage - See how many people have each tag applied
-
Identify tag type - Distinguish between Custom and System tags
-
Edit tags - Update custom tag details (name, color, description)
-
Delete tags - Remove custom tags no longer needed
-
Create new tags - Add tags to your library
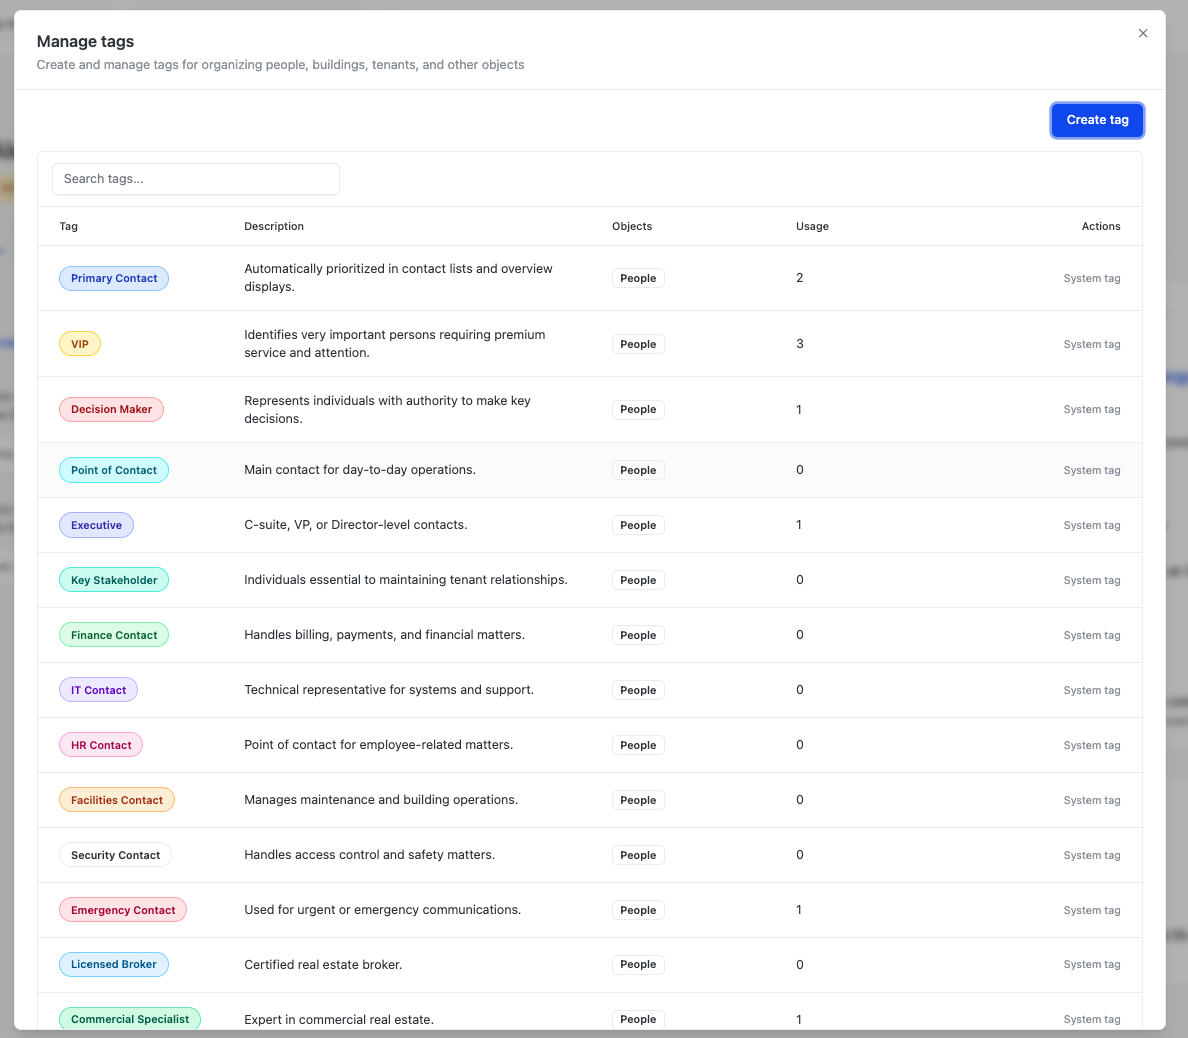
Table Columns:
-
Tag Name - The name displayed on contacts
-
People Using - Count of contacts with this tag applied
-
Tag Type - System or Custom
-
Actions - Edit or delete (custom tags only)
System Tag Protection: System tags appear with a "System Tag" indicator and cannot be edited or deleted. This ensures critical product functionality remains intact.
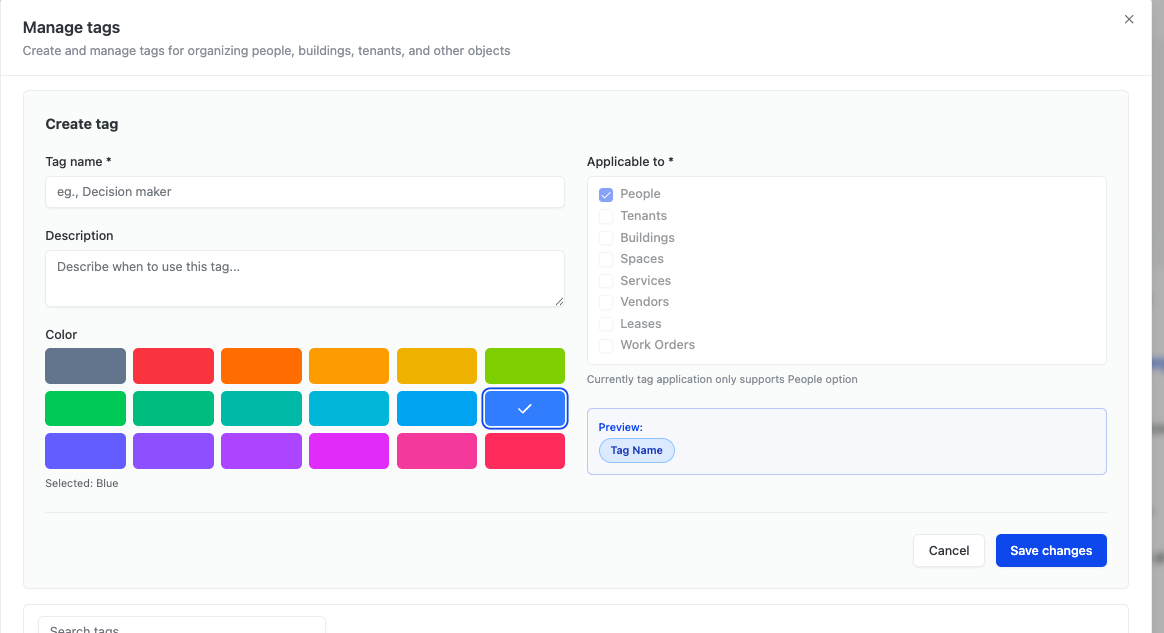
Creating New Tags
To Create a Tag:
-
Access the Manage Tags interface
-
Click Create Tag in the top right
-
Complete the tag creation form:
Tag Creation Fields:
-
Tag Name (required)
-
Choose a clear, descriptive name (e.g., "VIP", "Executive", "Primary Contact")
-
Keep names concise for easy scanning
-
-
Description (optional)
-
Add context about when/how this tag should be used
-
Helps ensure consistent application across your team
-
Example: "Apply to C-suite executives and key decision-makers"
-
-
Color (required)
-
Select from the color palette
-
Choose distinct colors for easy visual differentiation
-
Consider using similar colors for related tag categories
-
-
Applies To (future functionality)
-
Currently, tags only apply to People/Users
-
Future: Tags will be applicable to Tenants, Buildings, Spaces, Services, Vendors, Leases, Work Orders, and more
-
This field will allow you to specify which CRM objects can receive each tag
-
-
Click Create to add the tag to your library
-
The new tag is immediately available for application to contacts.
Editing Existing Tags
To Edit a Custom Tag:
-
Locate the tag in your Manage Tags library
-
Click the Edit icon (pencil) in the Actions column
-
Update any of the following:
-
Tag name
-
Description
-
Color
-
-
Click Save
-
The updated tag appears immediately across all contacts where it's applied
Note: You cannot edit System Tags—these are protected to ensure platform functionality.
Deleting Tags
To Delete a Custom Tag:
-
Locate the tag in your Manage Tags library
-
Click the Delete icon (X) in the Actions column
-
Confirm deletion
-
The tag is removed from your library and from all contacts where it was applied
Important: Deleting a tag is permanent and removes it from all contacts. If many contacts use this tag, consider editing it instead or creating a replacement tag before deletion.
Note: System Tags cannot be deleted.
Real-World Use Cases
Use Case 1: White-Glove Service for VIPs
Scenario: A large office campus with 3,000+ tenant employees across 20 companies.
Challenge: Frontline staff (concierge, security, facilities) can't memorize who the important people are at each tenant.
Solution:
-
Property manager tags key executives and VIPs with "VIP" and "Executive" tags
-
Concierge staff opens HqO CRM when interacting with tenants
-
Staff instantly sees tags next to names: "Alex Morgan - VIP, Executive"
-
Staff provides elevated service based on immediate context
Outcome: Consistent, informed service delivery without requiring extensive training or institutional knowledge.
Use Case 2: Targeted Communication
Scenario: Property team needs to communicate building updates to primary contacts only.
Challenge: Identifying the right person at each tenant company without digging through records.
Solution:
-
Apply "Primary Contact" system tag to key communicators at each tenant
-
Filter contacts by "Primary Contact" tag
-
Export filtered list for targeted email campaign
-
Ensure communications reach the right people
Outcome: Efficient, targeted outreach with confidence that messages reach decision-makers.
Use Case 3: Emergency Preparedness
Scenario: Building requires up-to-date emergency contact information for all tenants.
Challenge: Scattered emergency contact data across multiple systems and formats.
Solution:
-
Apply "Emergency Contact" system tag to designated contacts at each tenant
-
Filter by "Emergency Contact" to view complete list
-
Verify information is current and update using inline editing
-
Export for emergency response protocols
Outcome: Centralized, accessible emergency contacts that can be updated and referenced quickly.
Best Practices
Tag Creation & Naming
-
Use Clear, Consistent Names - Choose names that are immediately understandable to your entire team ("VIP" vs. "Important Person")
-
Avoid Redundancy - Before creating a new tag, search to see if a similar tag already exists
-
Add Descriptions - Include guidance on when/how to apply tags to ensure team-wide consistency
-
Choose Distinct Colors - Use different colors for different tag categories to enable quick visual scanning
-
Start Small - Begin with 5-10 essential tags; expand your library as needs emerge
Tag Application
-
Tag Strategically - Apply tags that will be actionable and useful for your team's workflows
-
Keep Tags Current - Remove tags when they're no longer accurate (e.g., someone leaves a role)
-
Use Multiple Tags - Don't hesitate to apply several tags to one person if they serve multiple roles
-
Leverage System Tags - Apply system tags like "Primary Contact" to power product features and filtering
-
Share Tag Definitions - Ensure your team understands what each tag means and when to apply it
Tag Maintenance
-
Audit Regularly - Periodically review your tag library and remove unused tags
-
Monitor Usage - Check the "People Using" column to identify underutilized tags
-
Update as Needed - Edit tag names or colors if they're causing confusion
-
Coordinate with Team - Establish shared conventions for tag application across your organization
-
Protect System Tags - Never attempt to replicate system tag functionality with custom tags—use the system tags provided
Filtering Workflows
-
Pin Common Filters - Save frequently-used tag filters to speed up your workflow
-
Combine Filters - Use multiple tags together to narrow results (e.g., "VIP" + "Finance Contact")
-
Clear Filters After Use - Reset to full contact list when finished to avoid confusion
-
Train Your Team - Ensure everyone knows how to filter by tags to leverage this capability
Future Capabilities
Tagging Across All CRM Objects
While tags currently apply only to People/Users, HqO is building toward a comprehensive tagging system across the entire CRM platform.
Coming Soon - Tag Anything:
-
Tenants - Categorize tenant companies (e.g., "Enterprise Client", "Month-to-Month", "High Growth")
-
Buildings - Organize properties (e.g., "Trophy Asset", "Value-Add", "Core")
-
Spaces - Classify areas (e.g., "Premium Amenity", "Needs Refresh", "High Demand")
-
Services - Categorize offerings (e.g., "Premium Service", "Included", "Third Party")
-
Vendors - Organize service providers (e.g., "Preferred Vendor", "On Contract", "Emergency Only")
-
Leases - Tag agreements (e.g., "Expiring Soon", "Expansion Candidate", "Renewal Priority")
-
Work Orders - Classify requests (e.g., "Urgent", "Tenant-Facing", "Preventive Maintenance")
This universal tagging system will enable sophisticated organization and filtering across every aspect of your commercial real estate operations.
Troubleshooting
Q: I can't delete a tag. Why? A: You're likely trying to delete a System Tag. System tags are protected and cannot be deleted because they power critical product functionality. Only Custom tags can be deleted.
Q: Can I rename a System Tag? A: No. System tags are maintained by HqO and cannot be edited to ensure consistent functionality across all customers.
Q: If I delete a tag, what happens to contacts who have it? A: The tag is removed from all contacts where it was applied. This action is permanent and cannot be undone.
Q: Can I apply tags to tenants or buildings? A: Not yet. Currently, tags only apply to People/Users (contacts). Future releases will enable tagging across all CRM objects including tenants, buildings, spaces, and more.
Q: How many tags can I apply to one contact? A: There's no limit. Apply as many tags as needed to accurately categorize each contact.
Q: Can multiple users create and manage tags? A: Yes. Tag management permissions follow standard HqO admin permissions. Super admins, managers, and user admins can all create, edit, and delete custom tags.
What's Next
To see tagging in action and learn how it integrates with tenant management:
-
Review Tenant Detail Page documentation for context on where tags appear
-
Explore Tenant List View to understand portfolio-level tenant organization
-
Watch the Contact Tagging & Filtering Walkthrough video for a visual demonstration