Overview
The Resource Booking Kiosk lets you display a dedicated booking screen for a single resource or a collection of resources on any touchscreen device — no app download or login required. Tenants can walk up, view real-time availability, and book on the spot. Admins control the display and behavior of each kiosk through a dedicated settings tab in HqO Admin.
Things to Know
-
Bookings are attributed to the user who generated the kiosk URL. If user identification is not enabled, all walk-up bookings will be made under that user's account. We recommend creating a dedicated kiosk user in HqO Admin and using that account to generate the kiosk URL, so bookings are clearly identifiable and not tied to an individual admin's account.
-
Paid resources are read-only on the kiosk. Tenants can view availability but must book through the HqO app or web experience.
-
Tripleseat resources are also read-only on the kiosk. The same applies — viewing is available, but booking must happen via app or web.
-
Kiosk mode must be enabled per resource before adding to a collection. Resources without it toggled on won't appear as available options when setting up a Collections Kiosk.
-
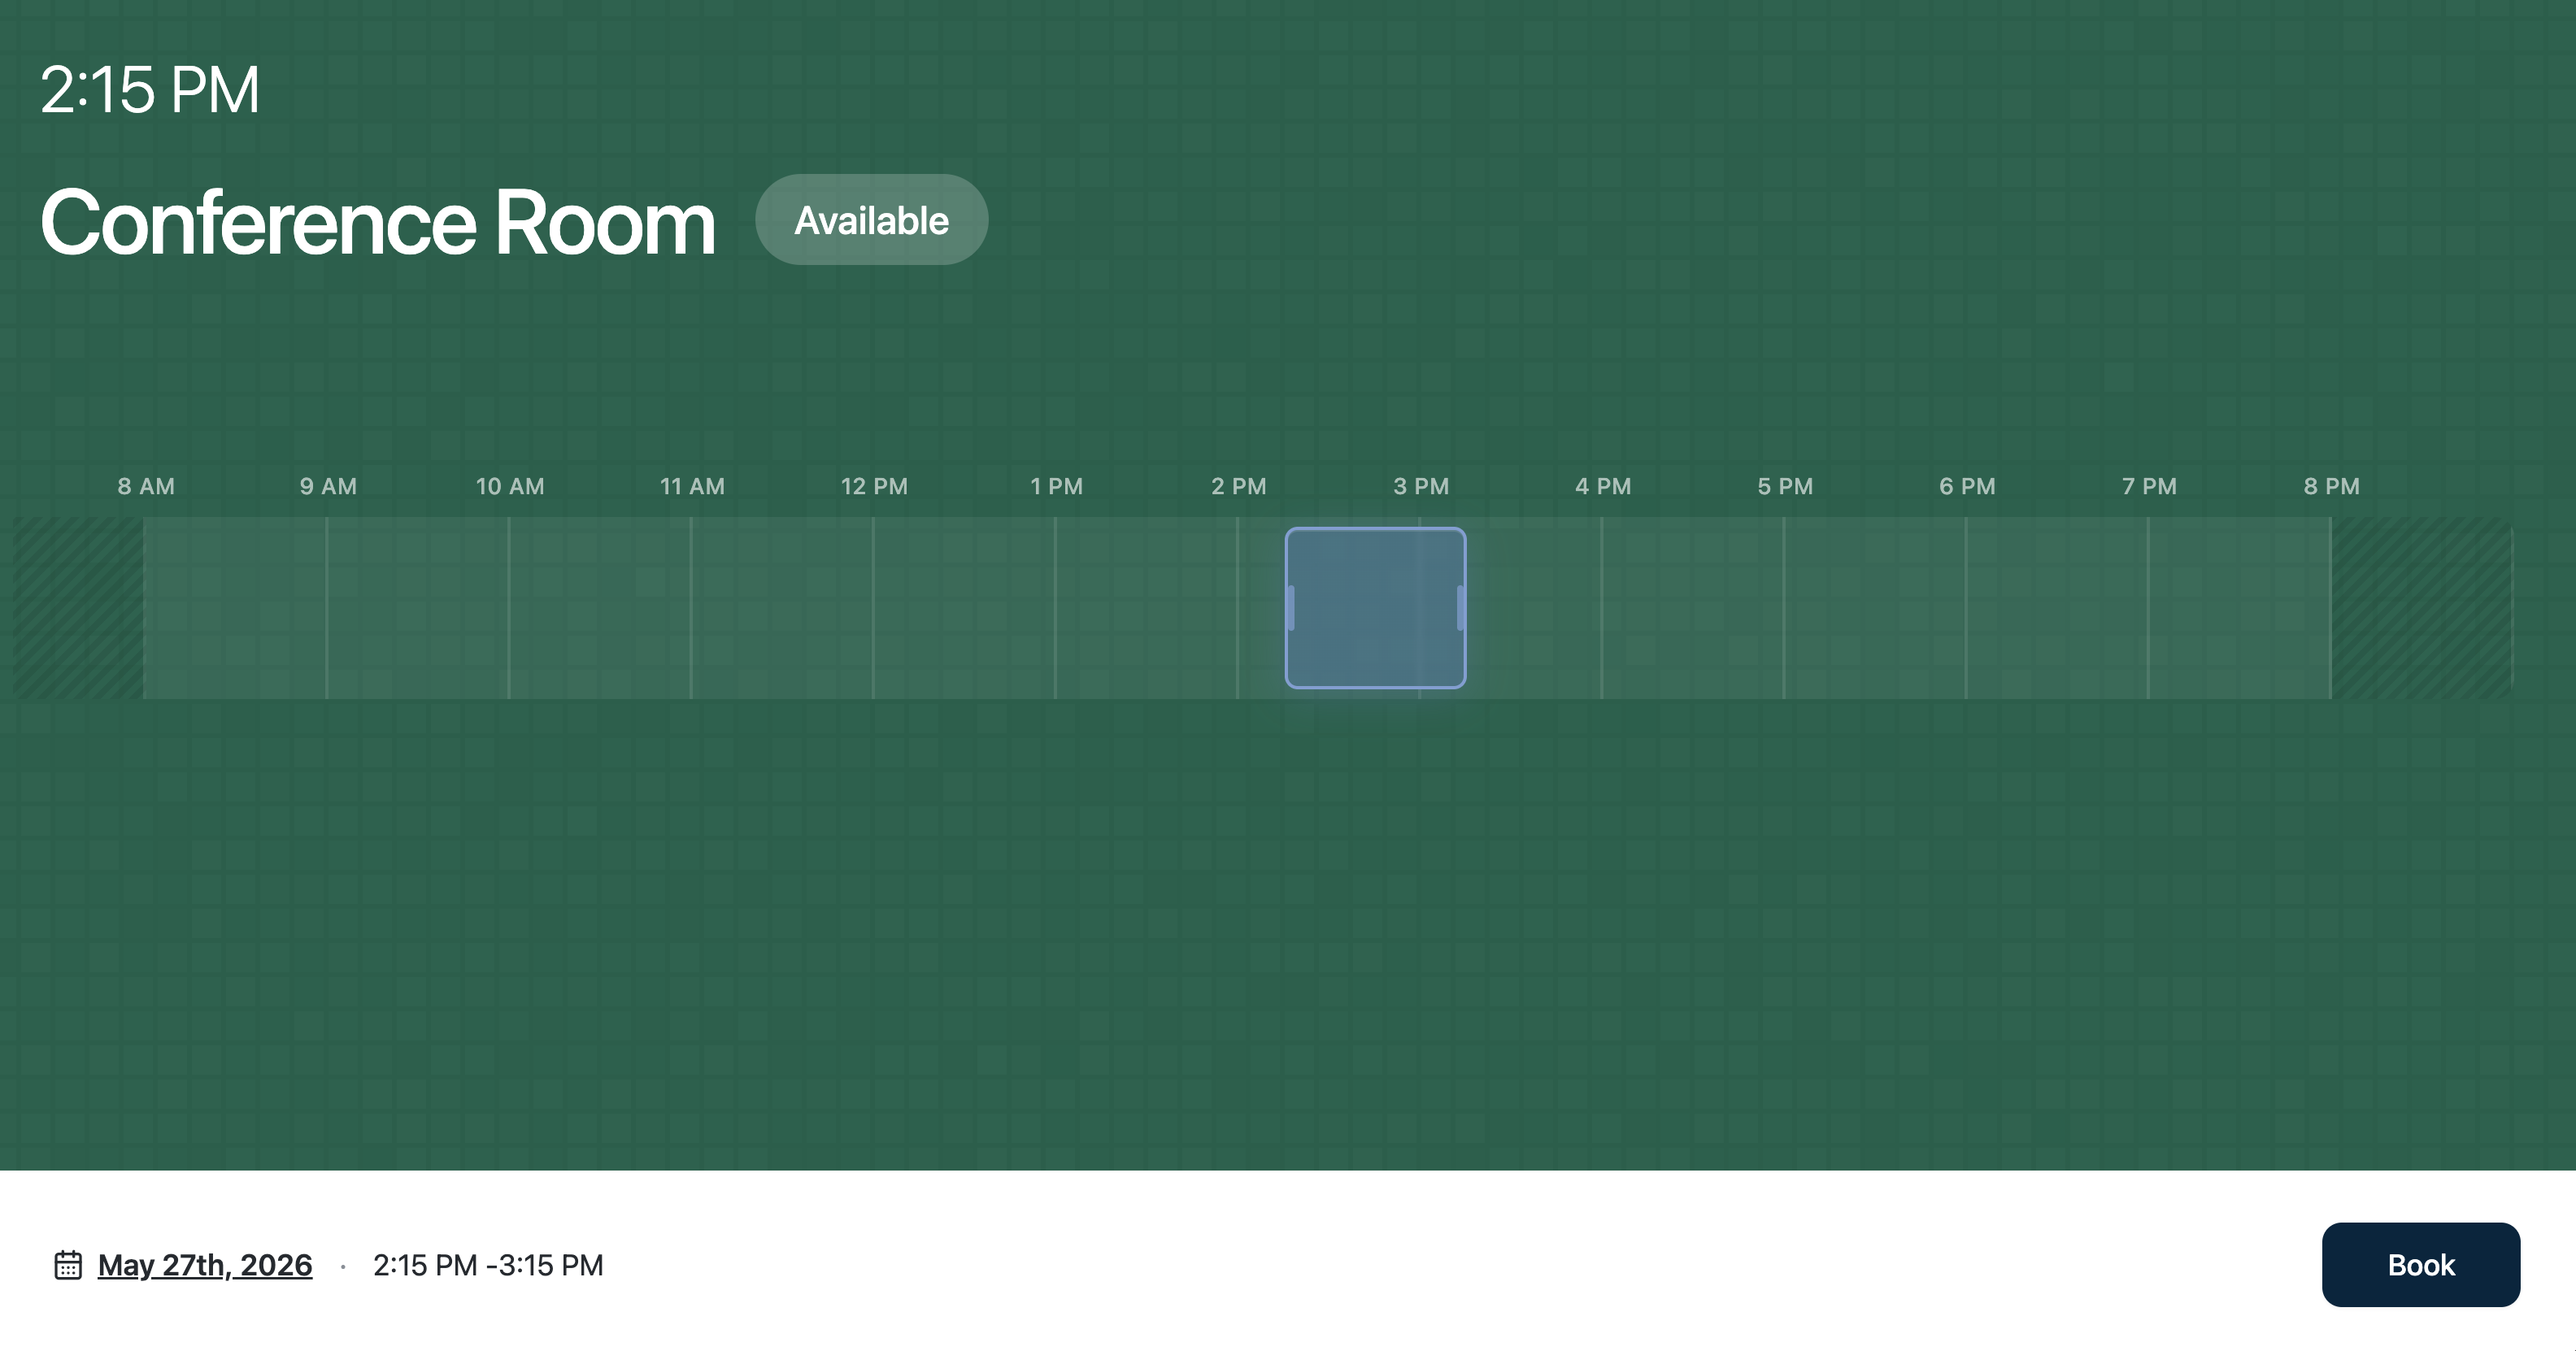
Availability updates in real time. The kiosk display reflects live availability pushed from HqO, so tenants always see what's actually free.
Kiosk Setup Options
There are two ways to set up a kiosk:
-
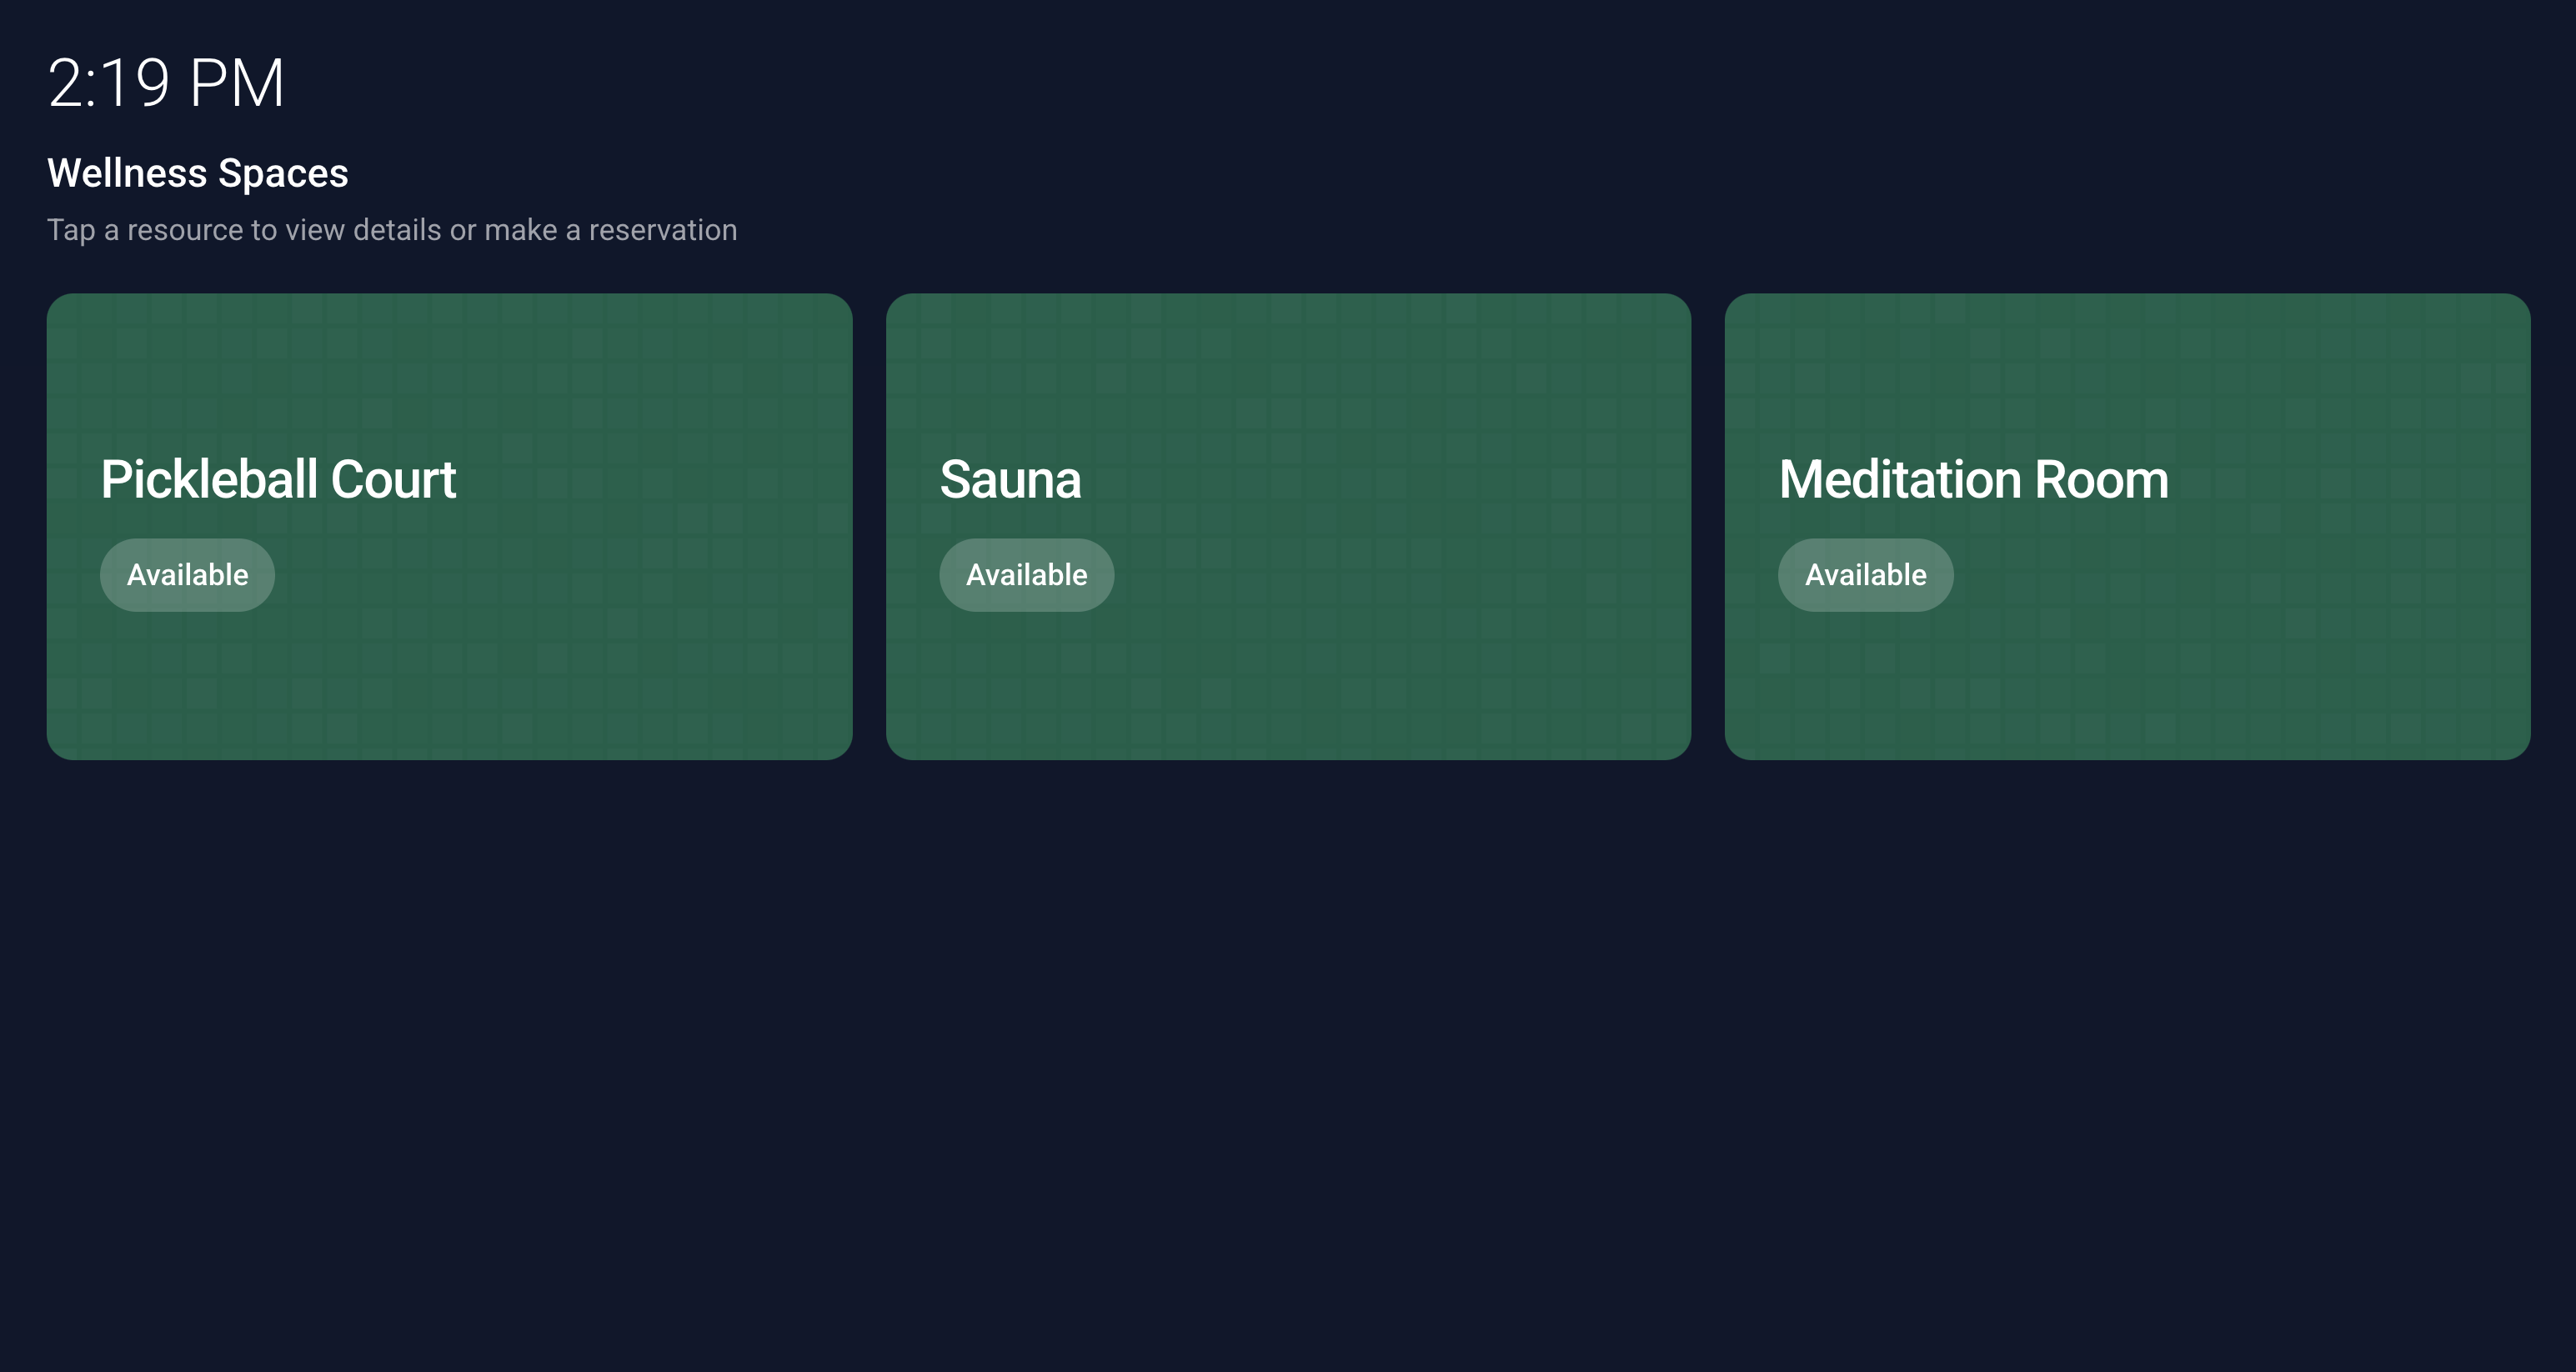
Single Resource Kiosk — displays one resource and its live availability schedule.
-
Collections Kiosk — displays multiple resources together so tenants can browse and choose.
Option 1: Single Resource Kiosk
Step 1 — Configure Kiosk Settings
-
Log into HqO Admin and navigate to Resource Booking.
-
Click into the resource you want to display on the kiosk.
-
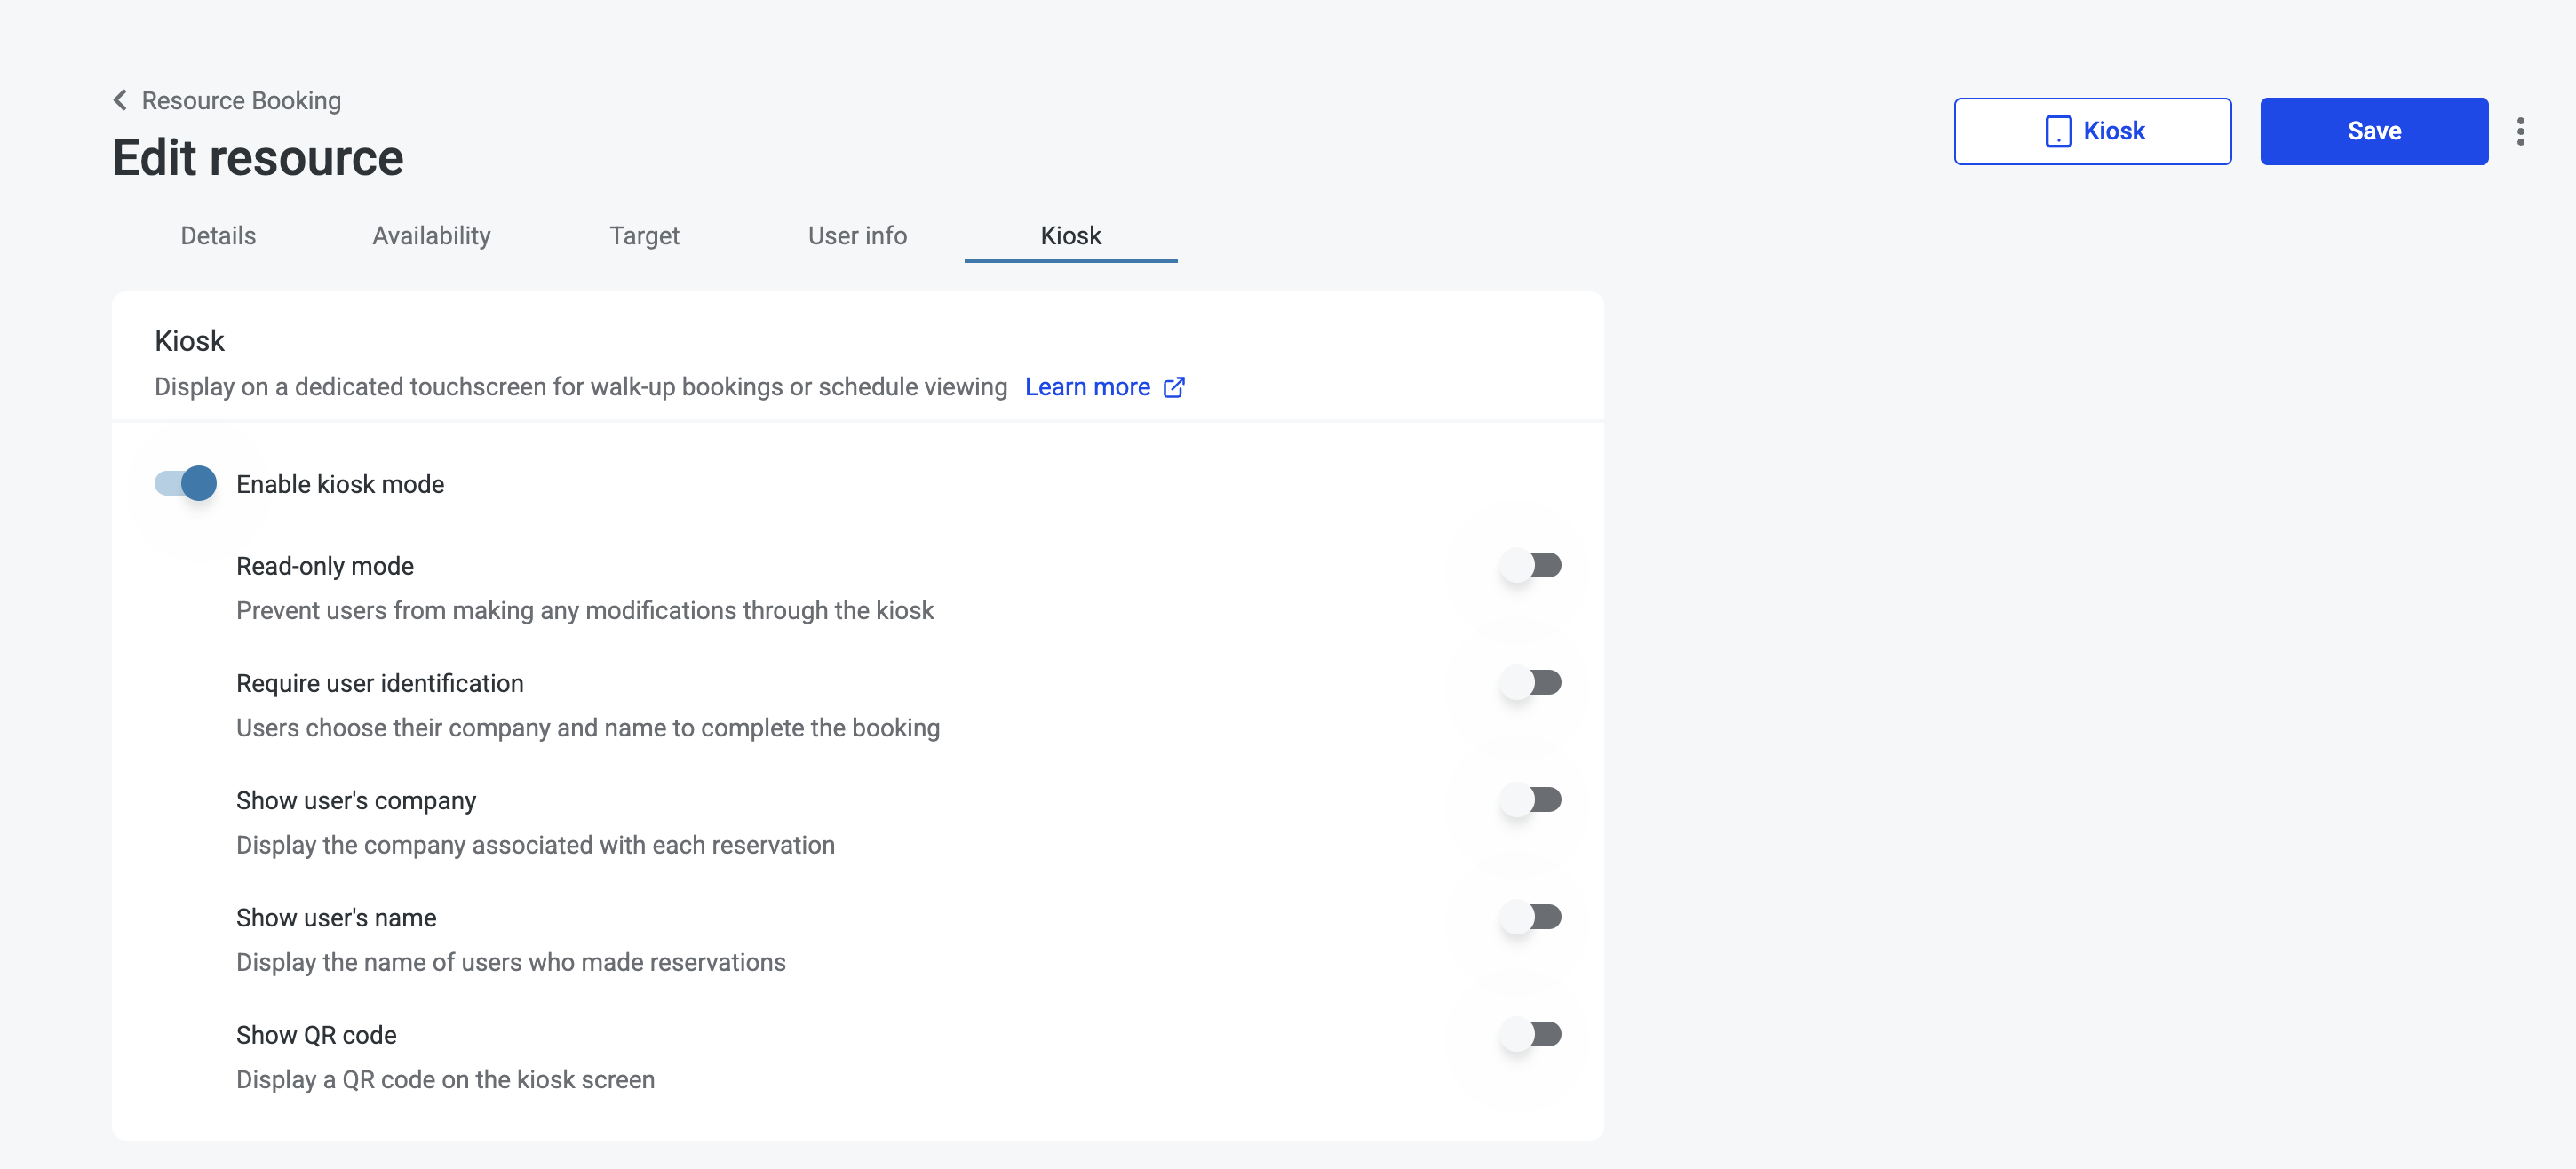
Go to the last tab in the resource editor, labeled Kiosk.
-
Configure your desired settings:
-
Read-only mode — prevents walk-up bookings; tenants can only view the schedule.
-
Show user name / company — displays the name and company of whoever made a booking.
-
Show QR code — adds a QR code tenants can scan to book via the app or web.
-
Require user identification — asks tenants to identify themselves before booking. If this is not enabled, all bookings made through the kiosk will be attributed to the admin who generated the kiosk URL.
-
-
Save your changes.
Step 2 — Launch the Kiosk
-
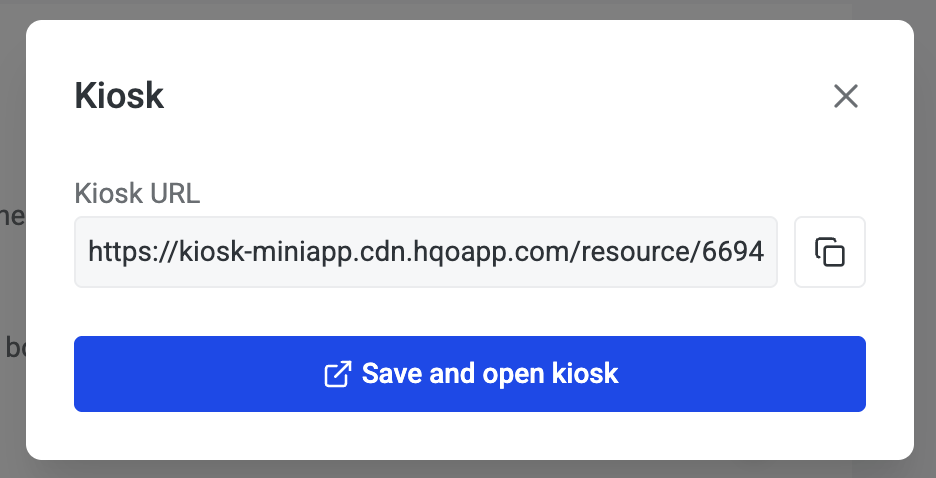
With the resource still open, click the Kiosk button in the top right corner.
-
A modal will appear with the kiosk URL.
-
Either copy the URL to paste into a browser on your display device, or click Open kiosk to launch it directly. If you've made changes, the button will read Save and open kiosk, which saves your settings and updates the kiosk.
Option 2: Collections Kiosk
A Collections Kiosk groups multiple resources on a single display screen. Before setting it up, kiosk mode must be enabled individually on each resource you want to include.
Step 1 — Enable Kiosk Mode on Each Resource
-
Navigate to each resource you want in the collection.
-
Go to the Kiosk tab and toggle on Enable kiosk mode.
-
Repeat this for every resource before proceeding. Resources without kiosk mode enabled will not be available for selection in the collection.
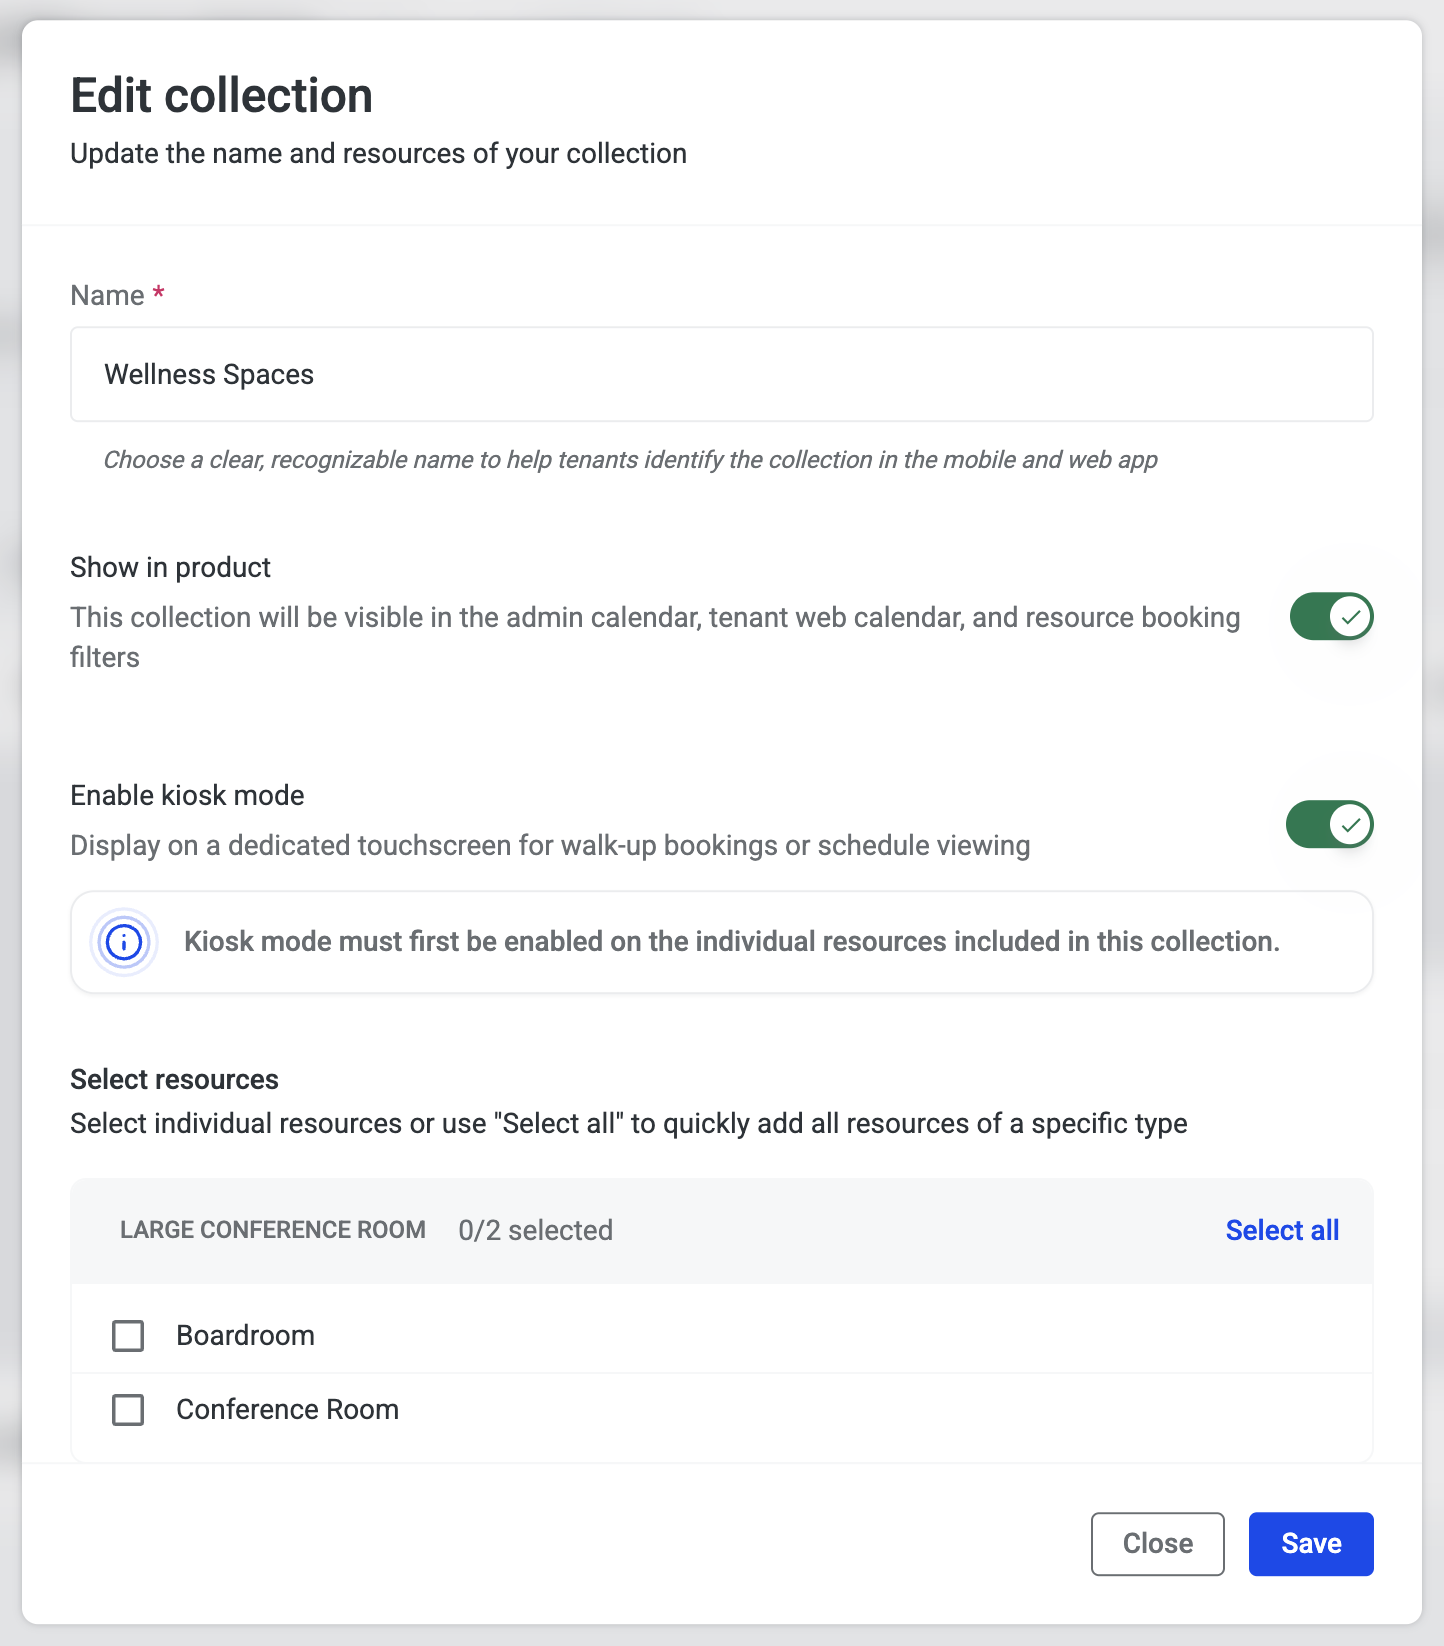
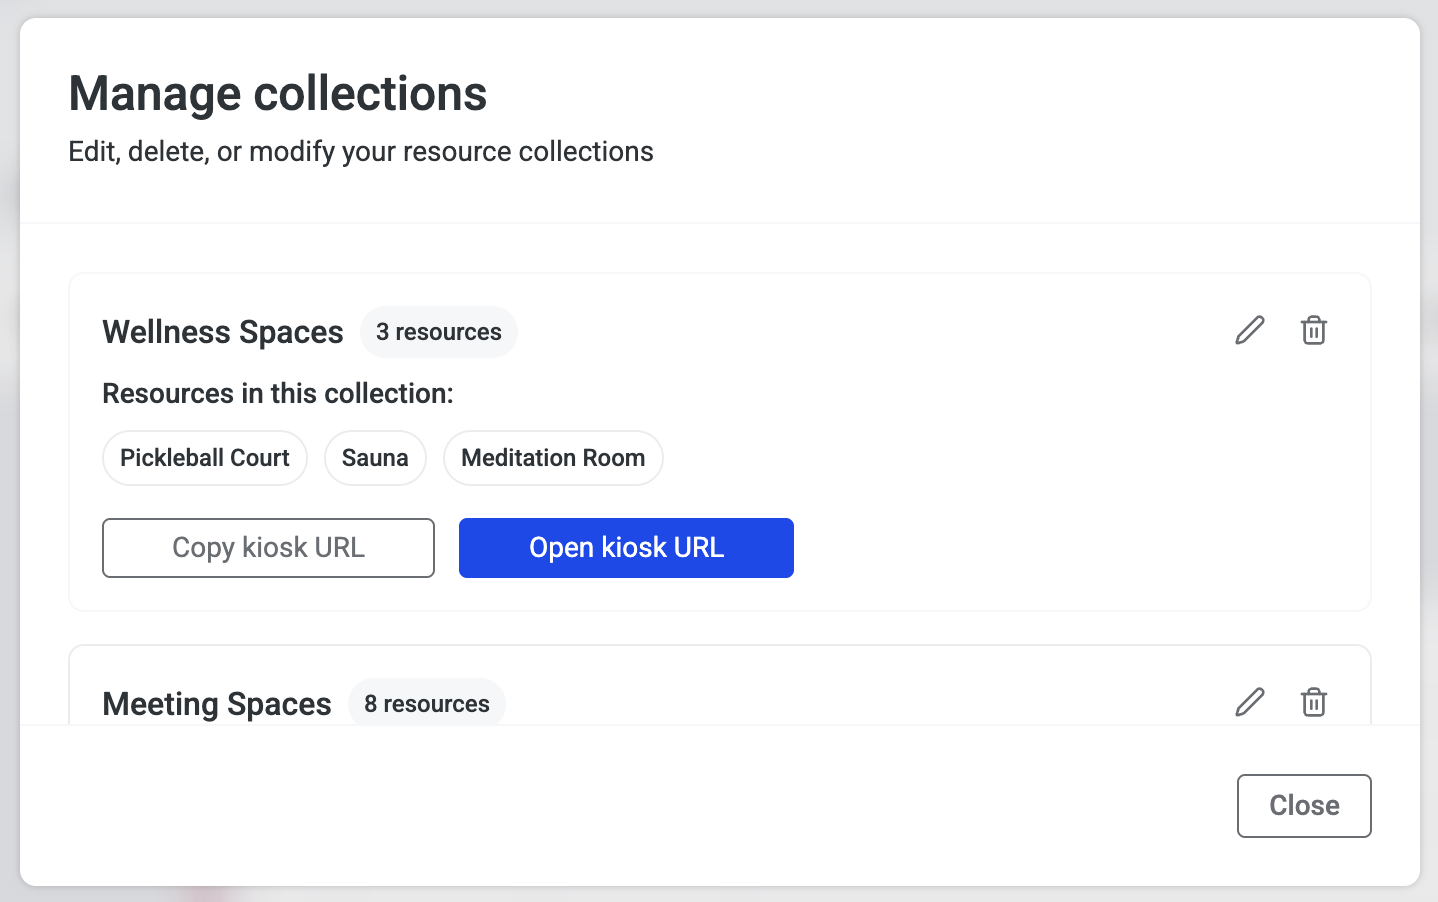
Step 2 — Create or Edit a Collection
-
In Resource Booking, create a new collection or open an existing one.
-
In the collection modal, toggle on Enable kiosk mode.
-
Select the resources to include in the kiosk view.
-
Save the collection.
Step 3 — Launch the Collection Kiosk
-
Click Manage Collections.
-
Locate your collection and click Copy kiosk URL or Open kiosk URL.
Deploying on a Device
The kiosk runs in any modern browser, so it can be deployed on an iPad or an Android tablet. The steps below cover how to lock the device to the kiosk view on each platform.
Deploying on an iPad
iPads support Apple's built-in Guided Access feature, which locks the device to a single app or URL.
Add the Kiosk to the Home Screen
-
Open the kiosk URL in Safari.
-
Tap the Share icon and select Add to Home Screen to save it as a shortcut.
Set Up Guided Access
-
On the iPad, go to Settings → Accessibility → Guided Access.
-
Toggle Guided Access on.
-
Tap Passcode Settings and set a passcode. You can also enable Face ID or Touch ID as an exit method.
Start a Guided Access Session
-
Launch the kiosk from the Home Screen.
-
Triple-click the Side button (or Home button on older iPads) to start a Guided Access session.
-
Optionally, circle areas of the screen to disable touch in those zones.
-
Tap Start in the top right corner to lock the iPad to the kiosk view.
Exit Guided Access
-
Triple-click the Side or Home button again.
-
Enter your Guided Access passcode (or use Face ID/Touch ID).
-
Tap End to restore normal iPad functionality.
Deploying on an Android Tablet
Android tablets can be locked to a single app using Android's built-in Screen Pinning feature, or put into a dedicated kiosk mode using Device Owner / Kiosk Mode for a more robust deployment.
Screen Pinning
Screen Pinning locks the display to a single app until a PIN or biometric is used to unpin it.
-
Open Settings → Security (or Biometrics and Security on Samsung) and enable Screen Pinning (sometimes listed as App Pinning).
-
Open Chrome and navigate to the kiosk URL.
-
Tap Add to Home Screen from the Chrome menu to save the kiosk as a shortcut.
-
Launch the kiosk from the Home Screen.
-
Open the Recent Apps view (swipe up and hold, or tap the square button).
-
Tap and hold the app icon at the top of the Chrome card and select Pin.
-
The device is now locked to the kiosk view. To exit, press and hold both the Back and Recent Apps buttons simultaneously, then enter your PIN or pattern.
Compatible Tablets
HqO recommends iPad or Samsung Galaxy tablets as they are the most flexible and compatible with the widest range of wall mounts.
Apple iPad
-
iPad (Standard) — Entry-level, budget-friendly option
-
iPad Mini — Most compact option; good for smaller wall spaces or tighter installations
-
iPad Air — Mid-range option with excellent performance
Samsung Galaxy Tab Series (Most Popular for Kiosk Use)
-
Galaxy Tab A9 / A9+ — Budget-friendly; available in 8.7" and 11"
-
Galaxy Tab S9 / S10 Series — Premium options available in 10.9", 12.4", and 14.6" (Ultra)
-
Galaxy Tab S9 FE / S10 FE — Mid-range with good features
-
Galaxy Tab Active Series — Rugged, designed for enterprise use; 8" models
-
Galaxy Tab A8 — Popular choice for kiosk deployments
Commercial / Industrial-Grade Android Tablets
These are a more custom and higher-cost solution, suited for permanent or high-traffic installations.
-
Elo Touch Solutions — Purpose-built for kiosk use with native Ethernet ports
-
CDS (Commercial Display Systems) — Enterprise-focused with RJ-45 Ethernet support
Wall Mount Options
|
Mount |
Compatibility |
|---|---|
|
Maclocks |
iPad and Samsung; wall mount and stand mount options |
|
Armodilo |
Multi-tablet compatibility |
|
VidaBox |
Compatible with both iPad and Samsung |
|
Mount-it |
Multi-tablet compatibility; budget-friendly option |