

Visitor Management: Custom Email Templates
The visitor invite email is the first thing a guest sees before they arrive. Building admins set up the branding and framework for the email in HqO Admin, and can optionally let each tenant add their own custom instructions — like parking, office entry, or floor directions — from the HqO web app, without touching the rest of the template.
Who does what
Two roles can touch the visitor invite email template, but each one controls a different part of it.
Building admin (works in HqO Admin) — controls the full email framework: branding, sender details, header text, check-in instructions, default custom text, email signature, and attachments. Also decides whether tenants are allowed to add their own section.
Tenant admin (works in the HqO web app) — controls only the Custom email text section, and only if a building admin has turned this on for their building. Everything else appears locked.
Note: If tenant customization isn't turned on for a building, tenant admins won't see an editable Custom email text field at all — every section of the template will show as locked.
Building admin: Setting up the email framework (HqO Admin)
Building admins configure the visitor invite email at the building level. This is the framework every tenant's visitors will see, whether or not tenant customization is enabled.
Getting there
-
In HqO Admin, select the building and portfolio you want to configure.
-
Go to Operations > Visitor Management.
-
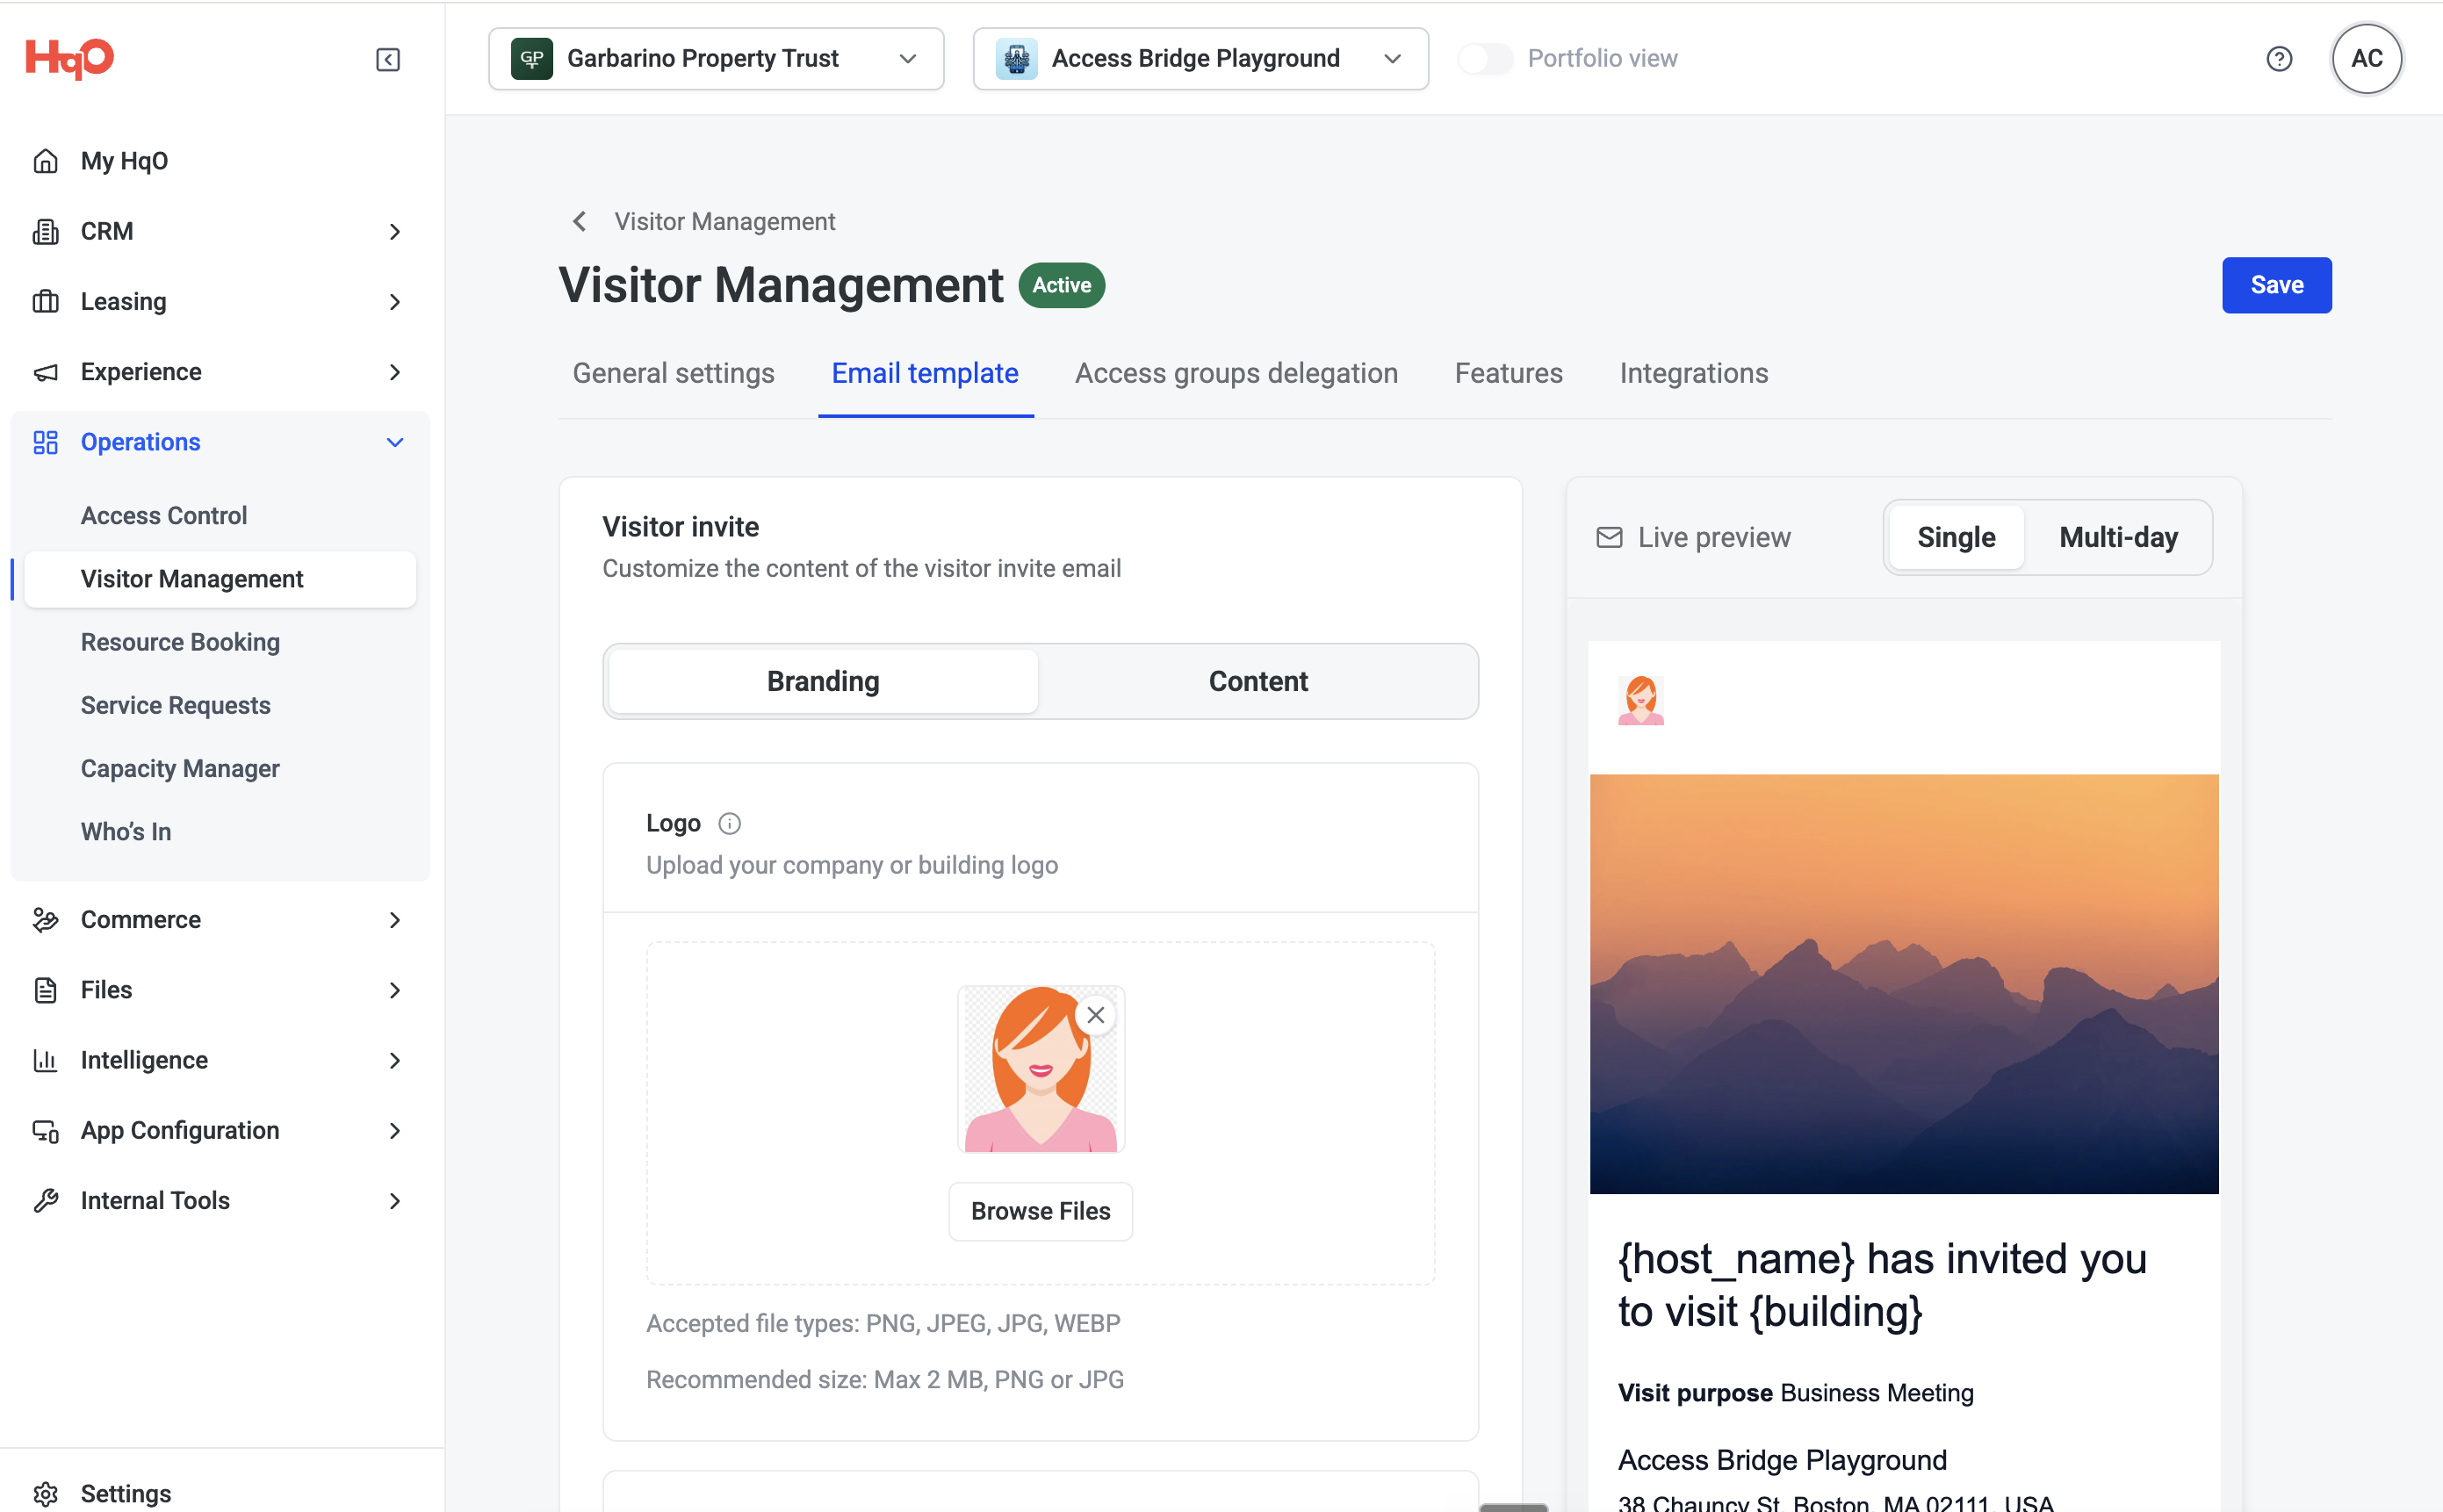
Select the Email template tab.
You'll see the Visitor invite panel on the left, with a Live preview of the email on the right. Use the Single and Multi-day toggle above the preview to check how the email looks for both visit types.
Branding
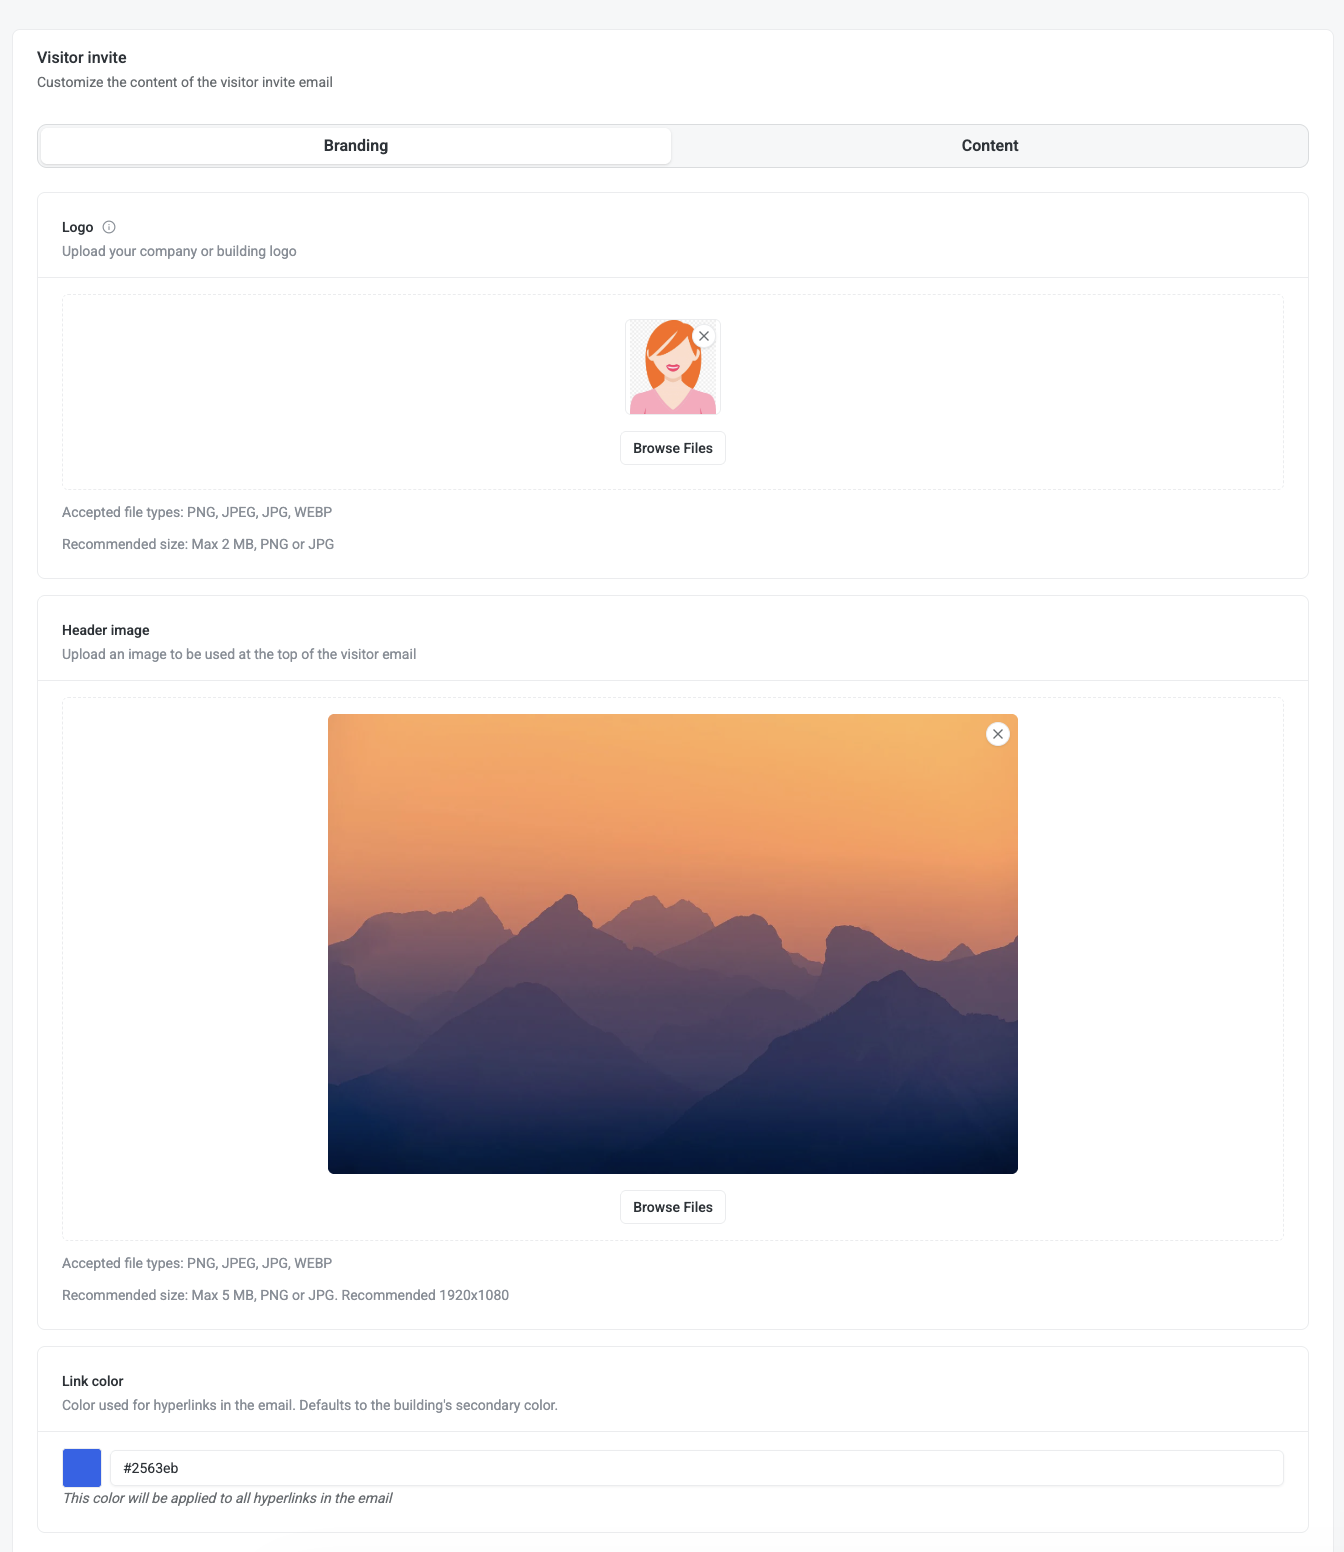
Select the Branding toggle to configure the visual identity of the email:
-
Logo — Upload your company or building logo. Accepts PNG, JPEG, JPG, or WEBP, up to 2 MB.
-
Header image — The banner image shown at the top of the email. Accepts PNG, JPEG, JPG, or WEBP, up to 5 MB (1920x1080 recommended).
-
Link color — The hex color applied to all hyperlinks in the email. Defaults to the building's secondary color.
Content
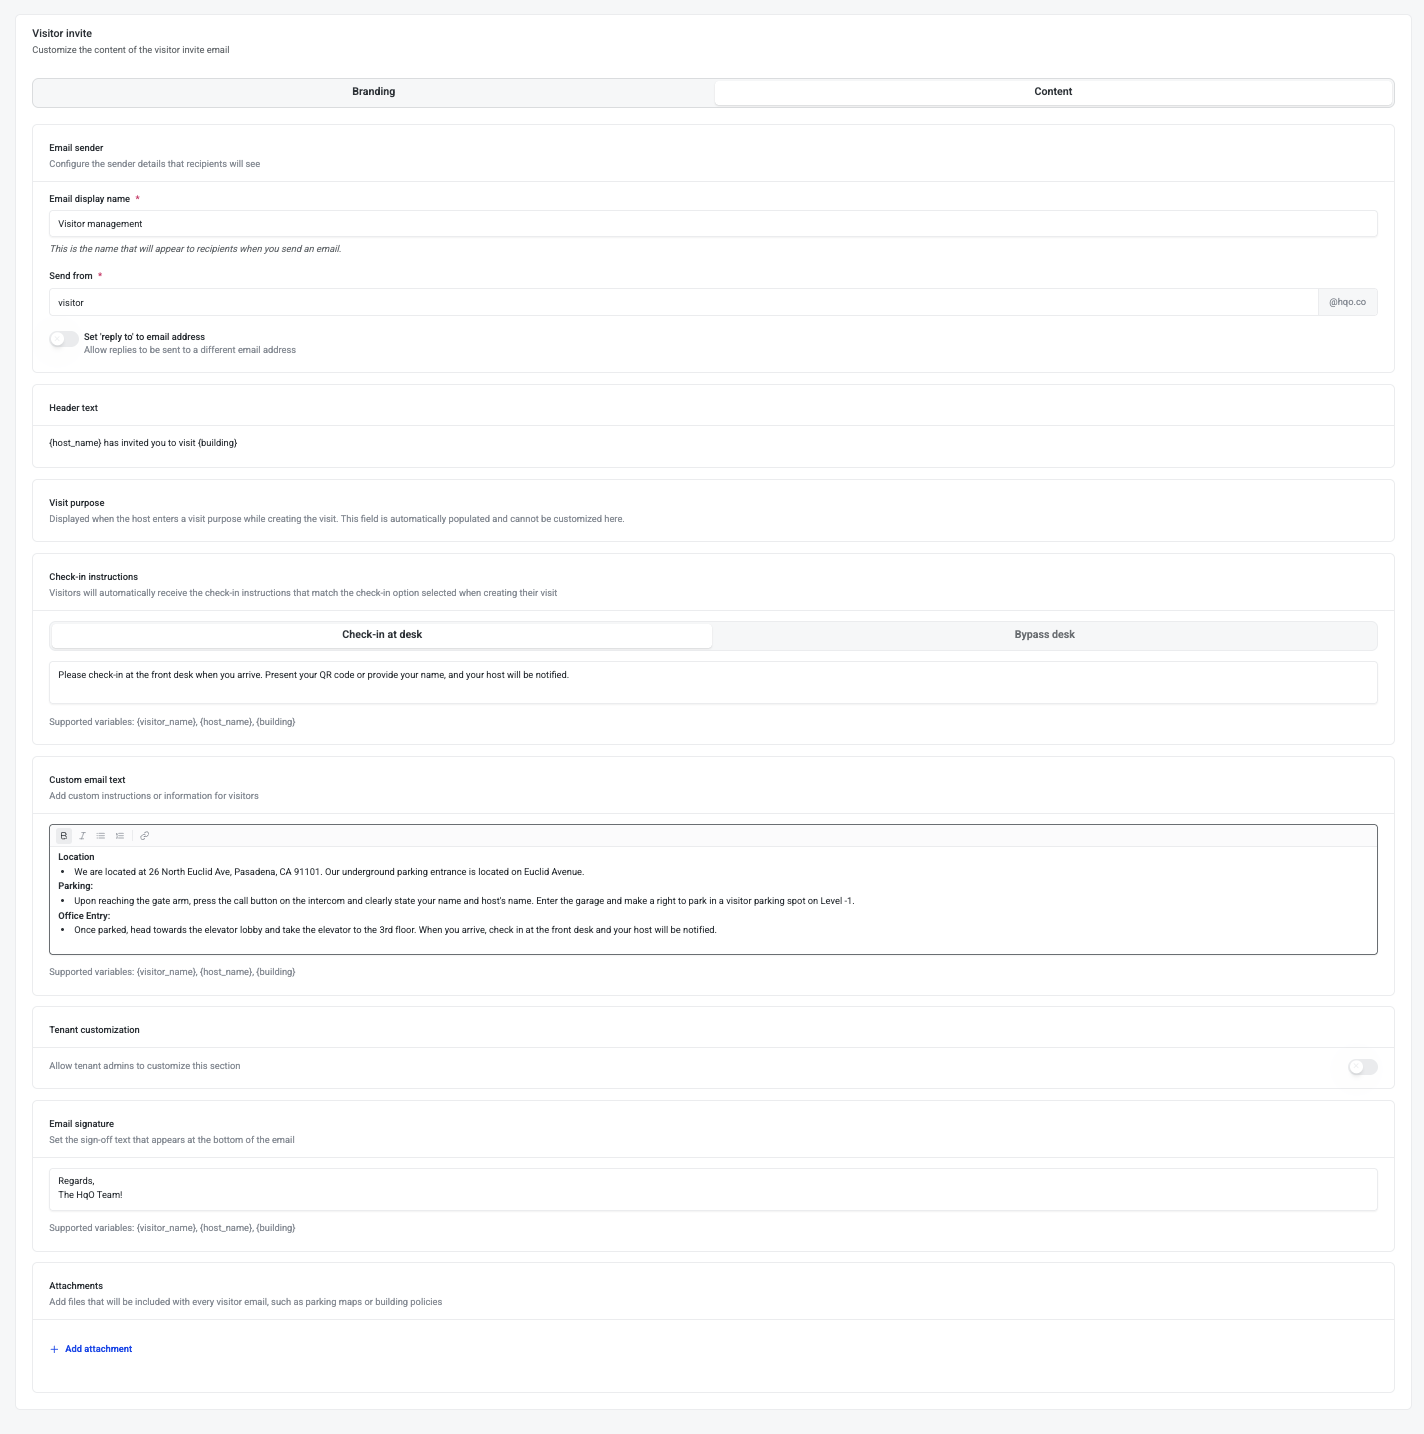
Select the Content toggle to configure the text and structure of the email:
-
Email sender — Set the Email display name and the Send from address (sent from your @hqo.co subdomain). Optionally turn on "Set 'reply to' email address" to route replies elsewhere.
-
Header text — The headline shown at the top of the email body. Supports the variables {host_name} and {building}.
-
Visit purpose — Read-only. This is automatically populated from the visit purpose the host enters when creating the visit, and can't be edited here.
-
Check-in instructions — Write separate instructions for Check-in at desk and Bypass desk visits. The correct version is sent automatically based on the check-in option selected for that visit. Supports {visitor_name}, {host_name}, and {building}.
-
Custom email text — A rich text field for anything else visitors should know, like directions, parking, or building entry. This is the section tenant admins can take over — see "Allowing tenant customization" below. Supports {visitor_name}, {host_name}, and {building}.
-
Email signature — The sign-off text at the bottom of the email (e.g. "Regards, The HqO Team!"). Supports the same variables as above.
-
Attachments — Add files sent with every visitor email, such as parking maps or building policies. Select "+ Add attachment" to upload.
Allowing tenant customization
Below Custom email text, there's a Tenant customization toggle: "Allow tenant admins to customize this section."
-
Off (default): The Custom email text you write here goes out to every visitor for every tenant in the building, exactly as written. Tenant admins see this section locked in the web app and can't change it.
-
On: Tenant admins can add their own custom text from the web app, in addition to the framework you've set up. Everything else in the template — sender, header text, check-in instructions, signature, attachments — stays locked and building-admin only.
Note: Turning tenant customization on doesn't remove your other settings — it only opens up the Custom email text section for tenants to personalize on top of what you've built.
Select Save once you're finished. Changes apply to future visitor invites right away.
Tenant admin: Personalizing your visitor invite (Web app)
If a building admin has turned on tenant customization for your building, you can add your own instructions to the visitor invite email your visitors receive — without needing property or security to make the change for you.
Getting there
-
In the HqO web app, go to Operations > Visitor Management.
-
Select the Email template tab.
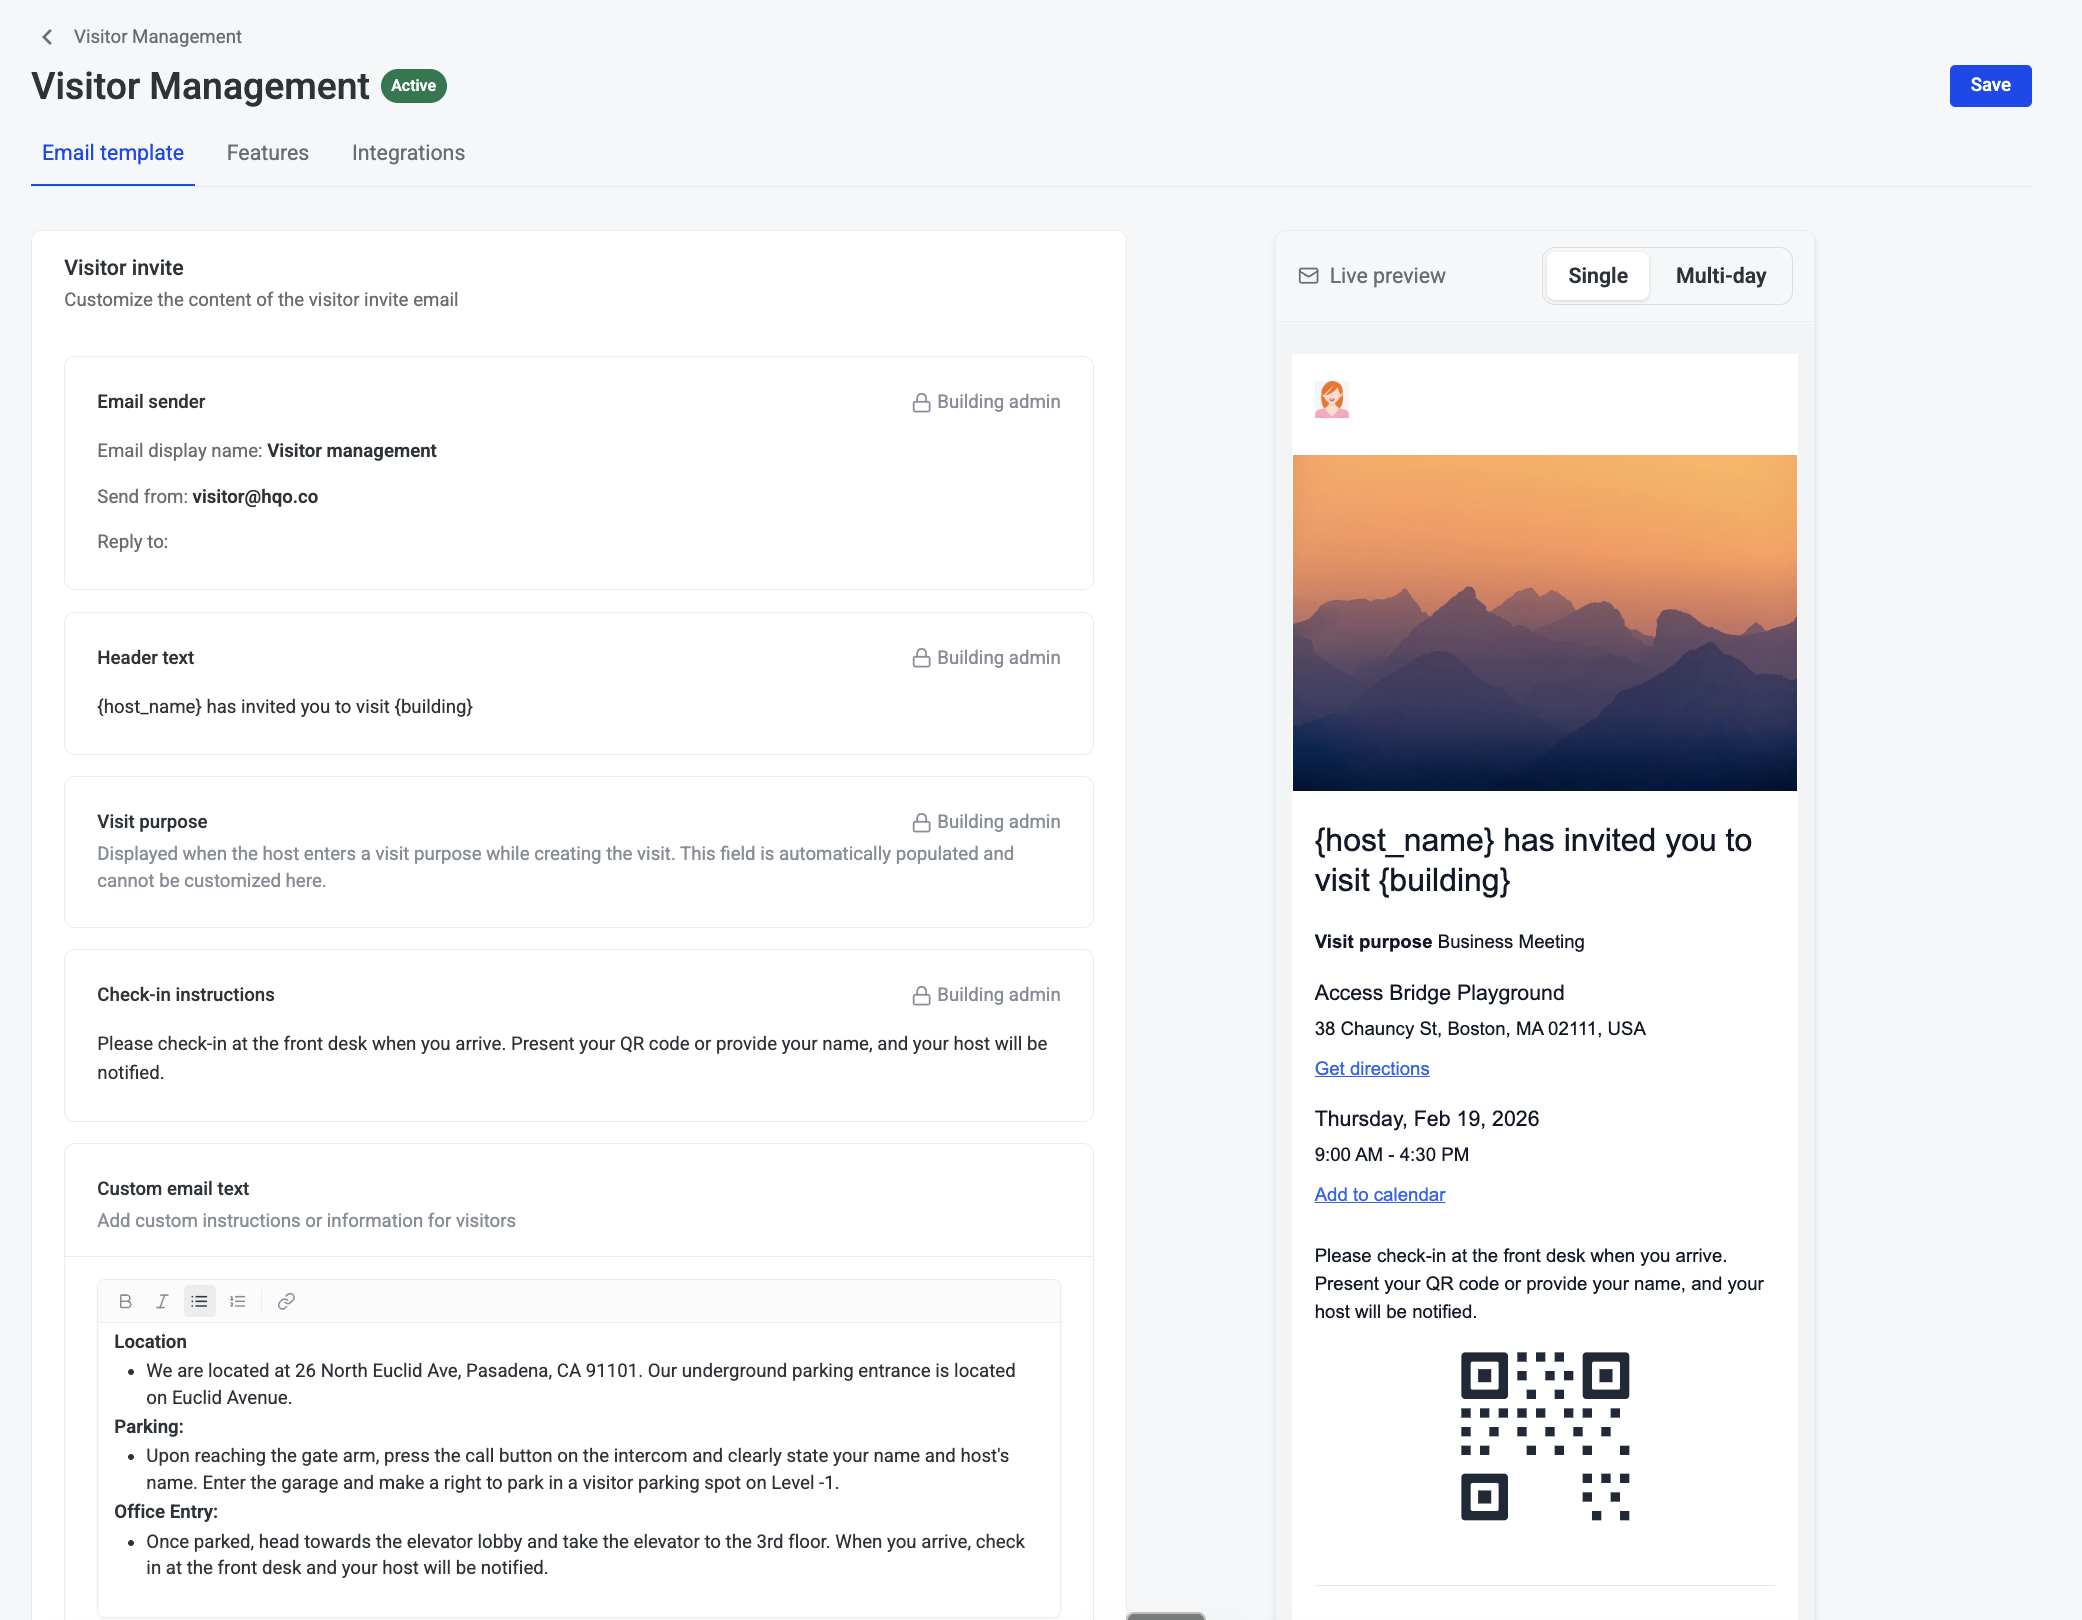
You'll see the same layout as the building admin view — Live preview on the right, template sections on the left — but with the Features and Integrations tabs only (no General settings or Access groups delegation, since those are building-admin-only areas).
What's locked, and why
Most sections — Email sender, Header text, Visit purpose, and Check-in instructions — display a "Building admin" lock icon. These are set at the building level so every tenant's visitors get a consistent, on-brand experience and reach the right entrance. You can view them, but you can't edit them.
Adding your custom instructions
The Custom email text section is the one part of the template you control. Use it to add anything specific to your space — floor directions, suite numbers, office entry steps, or your own parking guidance.
-
Select into the Custom email text field.
-
Use the formatting toolbar (bold, italic, bullet or numbered lists, links) to write your instructions.
-
Reference {visitor_name}, {host_name}, or {building} if you want the text to auto-populate with visit details.
-
Select Save.
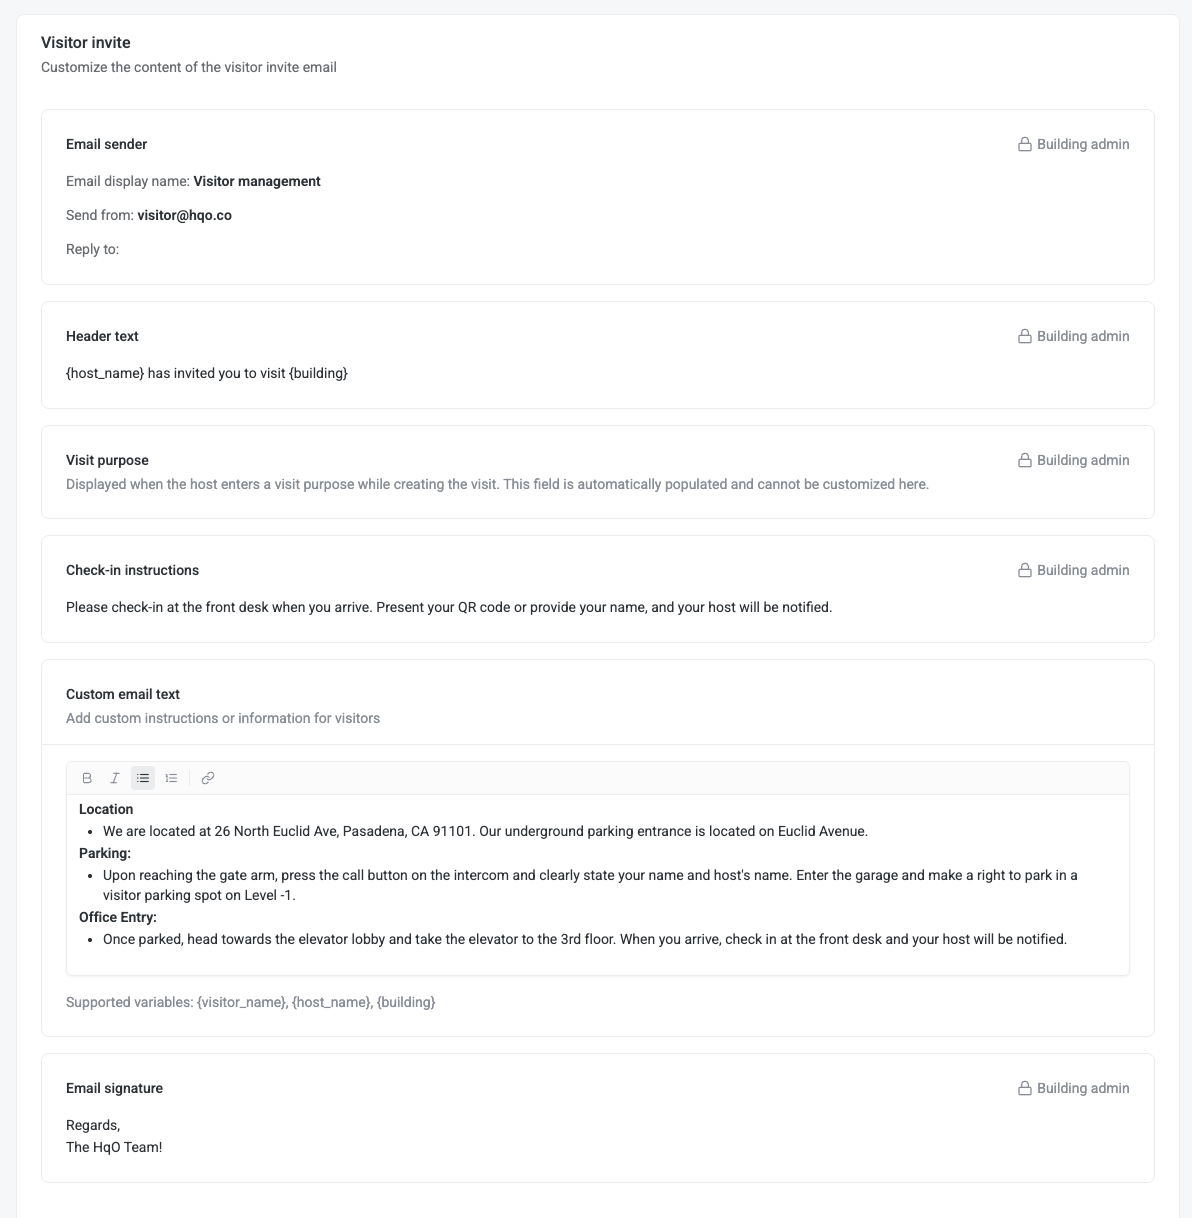
Check the Live preview on the right to confirm how your text will appear in the email, and toggle between Single and Multi-day to check both visit types.
Note: If you don't see an editable Custom email text field — only a lock icon — tenant customization hasn't been turned on for your building yet. Reach out to your property team to request it.
Supported variables
{host_name} — populates with the name of the employee hosting the visit
{visitor_name} — populates with the name of the invited visitor
{building} — populates with the name of the building the visit is taking place at
Why this matters
-
For property and security teams: Fewer repetitive questions about parking, entry, or directions — tenants can answer those for their own visitors directly in the email.
-
For tenants: Control over how their visitors experience the space, without waiting on the property team to update the template.
-
For visitors: Clear, consistent, and accurate guidance for getting into the building and to the right office — with less confusion and friction.